
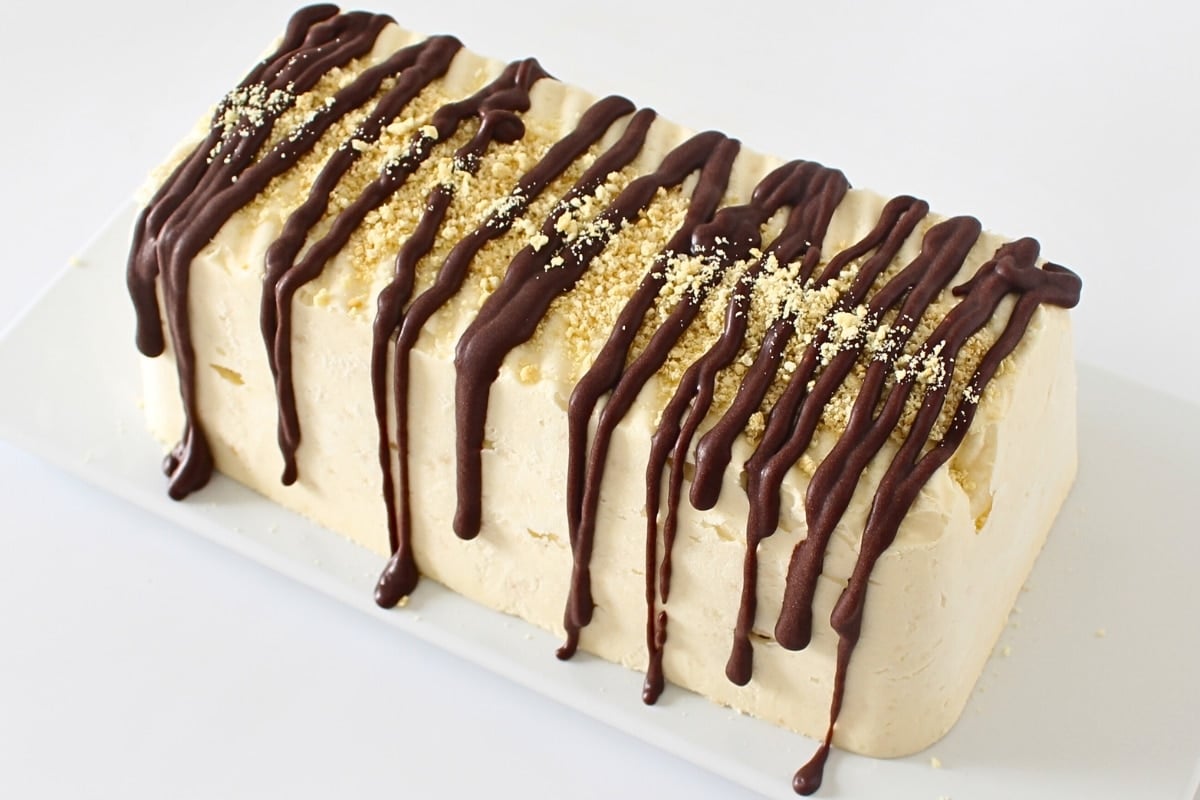
The Golden Oreo Icebox Cake is a no-bake dessert with layers of creamy filling and crunchy Golden Oreos. It's perfect for making ahead and storing in the freezer until you're ready to serve. Topped with Oreo crumbs and a drizzle of chocolate, it's a deliciously sweet treat for any time.

What is an Ice Box Cake?
An icebox cake is a no-bake dessert typically made by layering cookies or graham crackers with whipped cream or pudding. The dessert is refrigerated for several hours or overnight, allowing the cookies to soften and absorb the moisture from the cream, creating a cake-like texture. It's an easy and versatile dessert that's perfect for making ahead.
Why are Icebox Cakes Popular?
Icebox cakes are popular because they're easy to make, don’t need baking, and can be prepared in advance. The ingredients are simple and easy to find, and you can create various flavor combinations. Refrigerating the cake allows the cookies to soften and blend with the cream or other filling, making a tasty dessert without using the oven.
Oreo Icebox Cake Ingredients
- Golden Oreos (A): These are crushed to create a fine crumb that adds flavor and texture to the filling.
- Gelatine: This helps the filling set and hold its shape.
- Boiling Water: Used to dissolve the gelatine.
- Cream Cheese: Adds a rich, creamy texture to the filling.
- Sugar: Sweetens the filling.
- Heavy Cream: Provides a smooth, fluffy consistency to the filling.
- Vanilla: Enhances the flavor of the filling.
- Golden Oreos (B): Whole cookies used for layering within the cake.
- Golden Oreos (C): Crushed and used as a topping for added texture and decoration.
- Chocolate Sauce, Ganache, or Melted Chocolate: Drizzled on top for a finishing touch of sweetness and richness.
How To Make an Oreo Icebox Cake
Prepare the Filling:
Crush the Oreos: Use a stick blender or food processor to crush some Golden Oreos into fine crumbs. Set these crumbs aside for later.

Dissolve the Gelatine: Place a small bowl or cup in a larger bowl filled halfway with hot water to create a water bath. Add some boiling water to the small bowl, sprinkle in the gelatine, and stir until it’s completely dissolved. Keep the bowl of melted gelatine in the water bath to prevent it from setting too soon.

Mix Cream Cheese and Sugar: In a mixing bowl, blend the cream cheese and sugar with an electric hand mixer until smooth and well combined.

Add Cream and Gelatine: Gradually add the heavy cream and vanilla to the cream cheese mixture while continuously mixing on medium speed. Slowly pour in the warm melted gelatine and keep mixing until everything is well combined and smooth.

Incorporate the Crushed Oreos: Add the reserved crushed Oreos to the mixture and blend until the filling is thick and well combined.

Assemble the Icebox Cake:
Prepare the Pan: Use a silicone loaf pan or line a regular loaf pan with cling wrap for easy removal.
Layer the Filling: Spread one-third of the filling into the loaf pan. Use a spoon to press the mixture down firmly, removing any air bubbles, and work the mixture up along the sides of the pan to ensure a smooth finish when the cake is removed.

Add a Layer of Oreos: Place a row of Golden Oreos over the filling, pressing them lightly into the mixture.

Repeat Layers: Continue layering the filling and Oreos, ending with a layer of Oreos on top. You should have two layers of filling and two layers of Oreos.

Freeze the Cake: Cover the pan and freeze the cake overnight or for up to a month.
Serve the Oreo Icebox Cake:
Remove from Pan: If using a silicone loaf pan, simply fold down the sides to release the cake. For a regular loaf pan, lift the cake out using the cling wrap. You might need to briefly dip the pan in hot water to help release the cake.
Thaw the Cake: Place the cake on a serving platter and refrigerate it for a few hours until fully thawed.

Add Toppings: Before serving, sprinkle crushed Golden Oreos on top and drizzle with chocolate sauce, ganache, or melted chocolate.
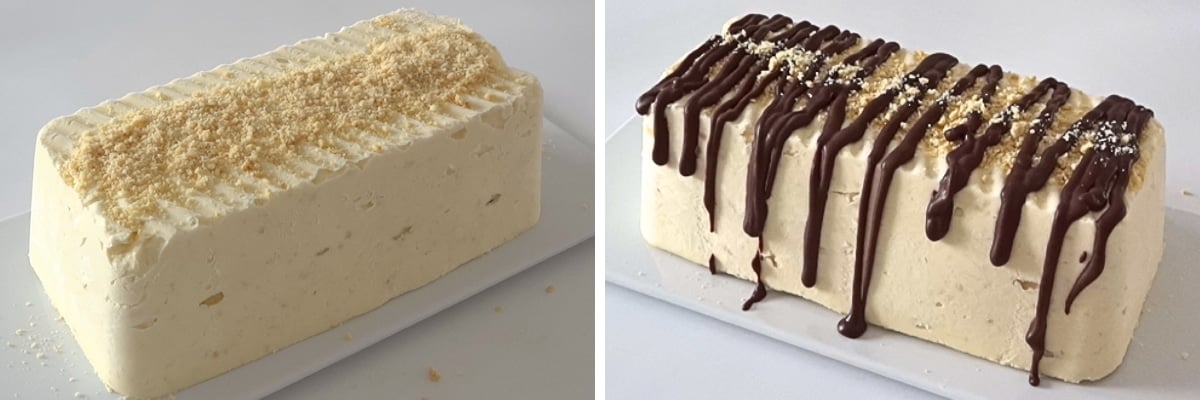
Slice and Enjoy: Cut the cake into slices and enjoy your delicious Golden Oreo Icebox Cake.

Fay's Top Tip
A pro tip for making the Golden Oreo Icebox Cake is to ensure the gelatine is fully dissolved and warm when you add it to the cream mixture. This helps it blend smoothly without forming lumps, resulting in a perfectly creamy filling that sets well.
Variations for Golden Oreo Icebox Cake
- Chocolate Oreo Icebox Cake:
- Use regular chocolate Oreos instead of Golden Oreos for a rich, chocolatey flavor. Top with chocolate shavings or cocoa powder.
- Strawberry Oreo Icebox Cake:
- Add a layer of fresh sliced strawberries between the layers of filling and Golden Oreos. Top with a strawberry sauce or fresh strawberries.
- Mint Oreo Icebox Cake:
- Use mint-flavored Oreos and add a few drops of peppermint extract to the filling. Top with crushed mint Oreos or a drizzle of mint chocolate.
- Peanut Butter Oreo Icebox Cake:
- Add a layer of peanut butter between the filling and Oreos. Top with chopped peanuts or a drizzle of peanut butter.
- Berry Oreo Icebox Cake:
- Mix fresh or frozen berries into the filling for a fruity twist. Top with a berry compote or whole berries.
These variations add different flavors and textures, making each version of the icebox cake unique and delicious.
More Desserts You Might Like


Common Questions
Yes, you can use any type of cookie you prefer, such as chocolate Oreos, graham crackers, or even homemade cookies. Just make sure they are firm enough to hold up in the layers.
The icebox cake should freeze for at least 6-8 hours. This allows the layers to set properly and the flavors to meld together.
Absolutely! You can make the icebox cake up to a month in advance. Just keep it covered in the freezer and thaw it in the refrigerator for a few hours before serving to decorate.
Make sure the gelatine is fully dissolved and still warm when you add it to the cream mixture. This helps it blend smoothly without forming lumps.
Yes, you can use any pan you have on hand, such as a square or round cake pan. Just adjust the layering process to fit the shape of your pan.

Golden Oreo Icebox Cake Recipe
INGREDIENTS
Filling
- 6 (6) golden oreos (A)
- 2 teaspoon (2 teaspoon) gelatine powder
- 2 tablespoon (2 tablespoon) water hot
- 250 g (8 oz) cream cheese
- 150 g (¾ cup) sugar
- 400 ml (1 ⅔ cups) heavy cream
- 2 teaspoon (2 teaspoon) vanilla
- 16 (16) golden oreos (B) for layering
Topping
- 2 (2) golden oreos (C)
- ⅓ cup (⅓ cup) chocolate sauce or ganache or melted chocolate
INSTRUCTIONS
Filling
- Process 6 Golden Oreos (A) into fine crumbs using a stick blender or food processor. Set aside.
- Dissolve the gelatine in 2 tablespoons of hot water. Keep warm in a water bath until ready to use.
- In a mixing bowl, blend cream cheese and sugar until smooth using an electric hand mixer.
- Add heavy cream and vanilla. Begin mixing then slowly add warm melted gelatine until well combined and thick.
- Stir in the reserved Oreo crumbs (A) until the mixture is thick and well blended.
Assembly
- Line a loaf pan with cling wrap or use a silicone loaf pan.
- Spread one-third of the filling in the loaf pan, pressing firmly to remove air bubbles and spread evenly along the sides.
- Layer Golden Oreos (B) over the filling. Repeat layers, ending with a layer of Oreos.
- Freeze overnight or up to a month.
Serving
- Remove the icebox cake from the silicone pan by folding down the sides. If using a regular loaf pan, dip it briefly in hot water to release the cake easily.
- Place the cake on a serving platter and refrigerate for a few hours until fully thawed.
- Before serving, top with Oreo crumbs (C) and drizzle with chocolate sauce, ganache, or melted chocolate. Slice and enjoy.
NOTES
- Use a food processor for evenly crushed Oreos.
- Ensure gelatine is fully dissolved to avoid lumps.
- Press filling firmly to avoid air bubbles and achieve a smooth finish.
- Allow the cake to thaw in the fridge for a few hours before serving for the best texture.


Leave a Reply