
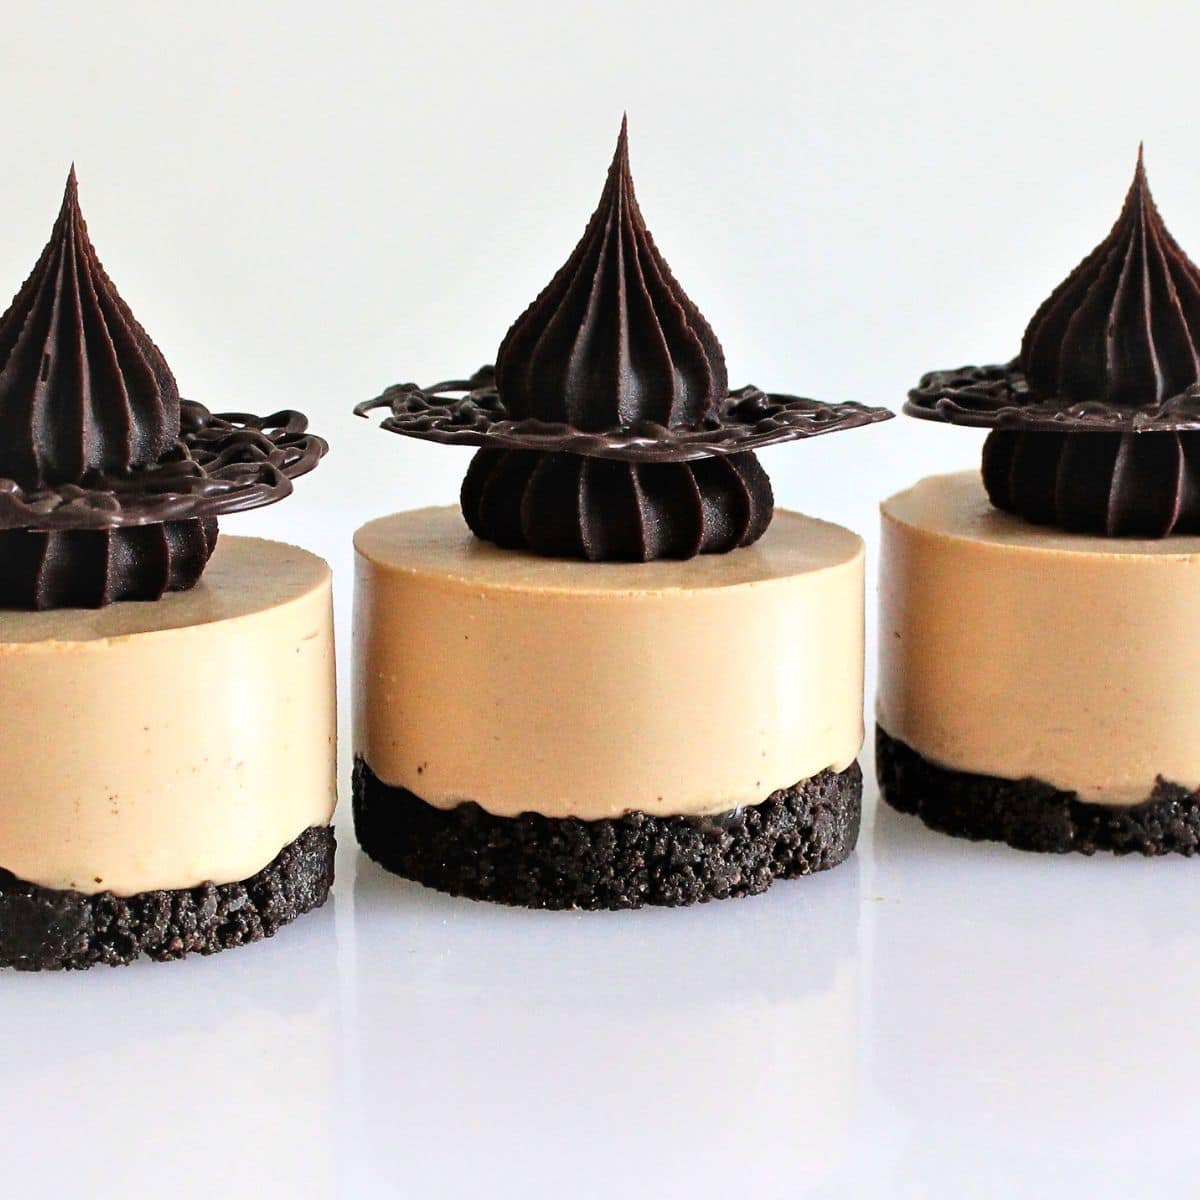
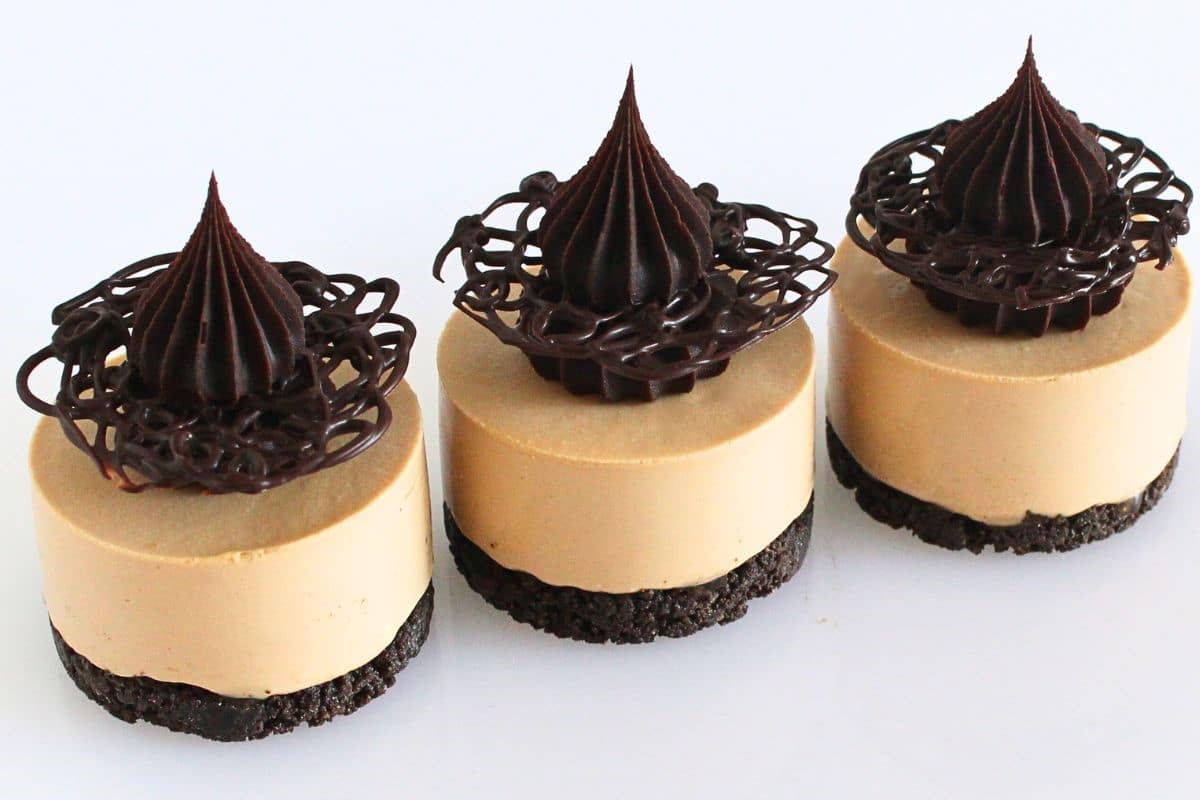
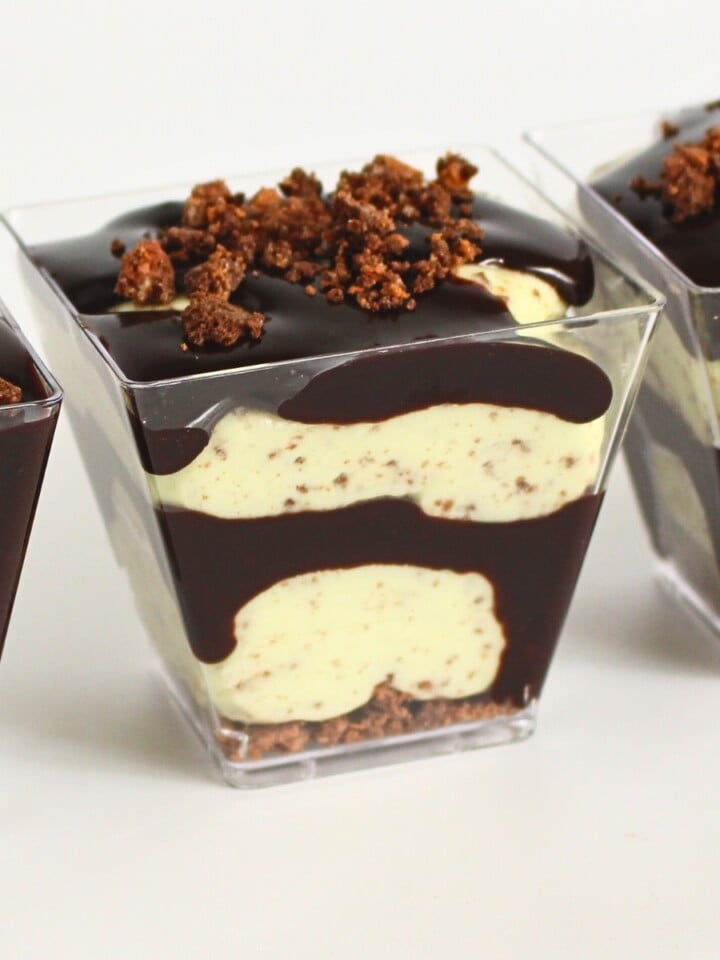
Mini Mars Bar Cheesecakes. This recipe is a delicious take on a no-bake cheesecake that combines the richness of Mars bars with the smooth silkiness of a cheesecake. Mars Bars are also known as Milk Way in some parts of the World. These mini cheesecakes are complemented by handmade chocolate decorations and truffle ganache kisses for an extra touch of indulgence.
Why You Will Love Mini Mars Bar Cheesecakes
You're going to love making these Mini Mars Bar Cheesecakes, trust me. They've got this awesome mix of textures that just works - a crunchy base underneath a smooth, creamy topping. And those Mars bars melted into the filling? They bring a rich, chocolatey flavor that’s hard to resist, making these little treats a hit with both kids and grown-ups. And those chocolate swirls and truffle kisses on top aren't just tasty; they make each cheesecake look so fancy without much fuss.
Ingredients For Mini Mars Bar Cheesecakes
Base:
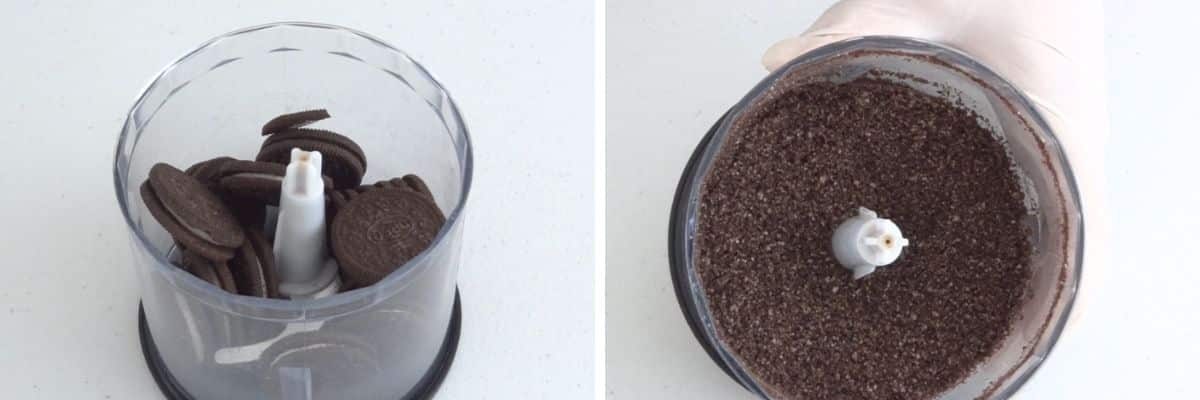
Chocolate Cookies: These can be plain or cream-filled. They are crushed to form the base layer of the cheesecakes, providing a sweet, crunchy texture.
Unsalted Butter, Melted: This acts as a binding agent for the cookie crumbs, helping to firm up the base when chilled.
Mars Bar Filling:
Gelatine: Used as a setting agent to help the cheesecake filling hold its shape.
Hot Water: This is used to dissolve the gelatine.
Milky Way or Mars Bars: In some parts of the world Mars Bars are known as Milk Ways. These are melted down and add the characteristic Mars bar flavour to the filling.
Heavy Cream: Helps in melting the Mars bars and adds creaminess to the filling.
Cream Cheese: The main component of the cheesecake filling, providing a rich and creamy texture.
Powdered Sugar: Sweetens the cheesecake filling. Adjust to your liking.
Vanilla: Adds flavour to the cheesecake filling. Adjust to your liking.
Heavy Cream: Whipped and folded into the mixture for a light, airy texture.
Chocolate Decorations:
Dark or Compound Chocolate: Melted and piped into decorations, adding a touch of chocolate flavour and visual appeal to these cute mini mars bar cheesecakes. Compound or cooking chocolate is a lot easier to work with because it doesn't need to be tempered.
Truffle Ganache Kisses:
Dark Chocolate: Provides a rich, deep chocolate flavour to the ganache.
Heavy Cream: When heated and mixed with the chocolate, it forms a smooth ganache. Any cream can be used.
How To Make Mini Mars Bar Cheesecakes
Prepare the Base:
Start by transforming chocolate cookies into fine crumbs. Whether you use a food processor or the old-fashioned way with a rolling pin, you're aiming for a sandy texture.
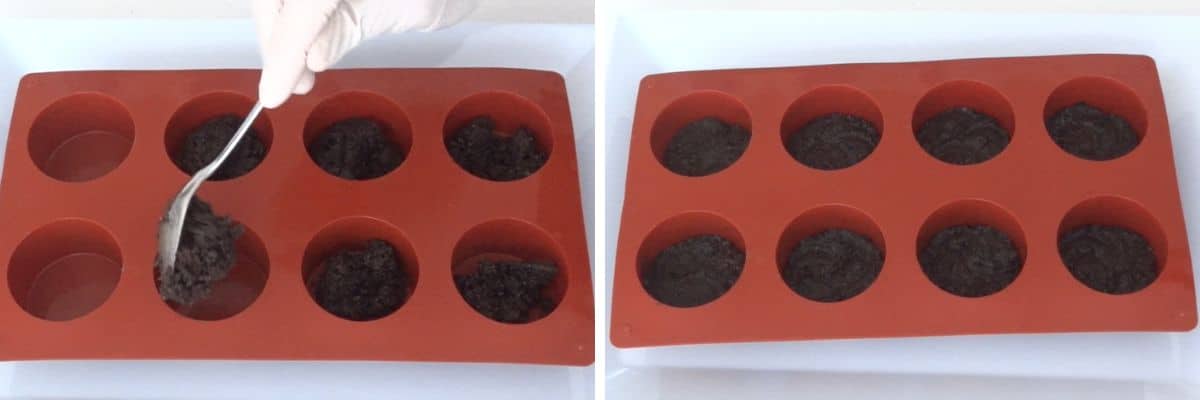
Combine those crumbs with melted butter. The butter acts like glue, holding the crumbs together. Press this mixture firmly into cupcake trays or silicone molds. This forms your cheesecake's foundation.

Pop the trays into the fridge to let the base set. This chilling time is crucial for a firm, snappy base that supports the creamy filling.
Make Mars Bar Filling:
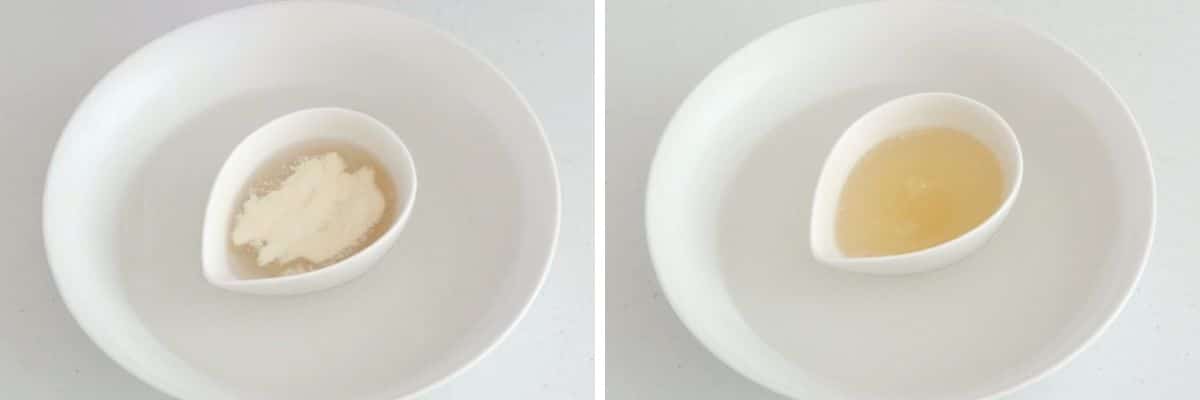
First up, dissolve gelatine in hot water. It's this ingredient that will give your filling the perfect set texture.
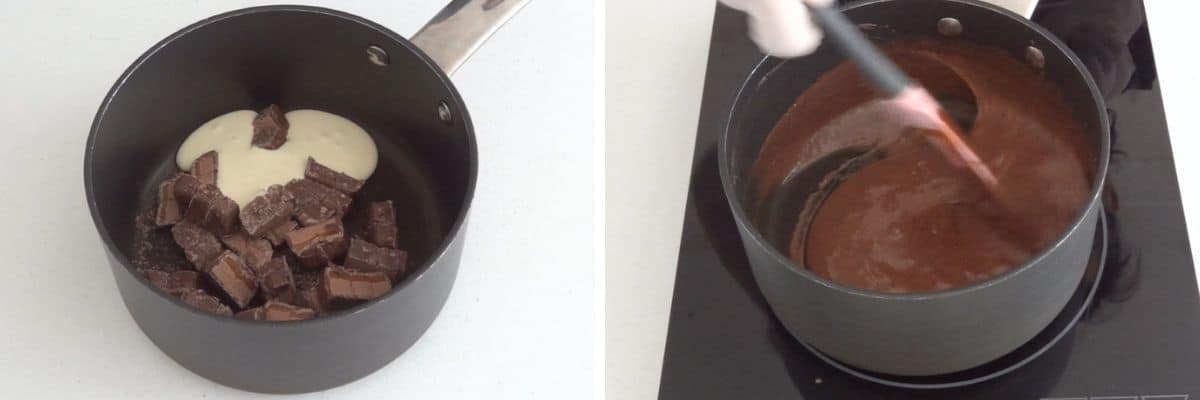
Melt Mars bars with a bit of heavy cream in a saucepan. This creates a smooth, chocolaty mix that’s the star of your filling.
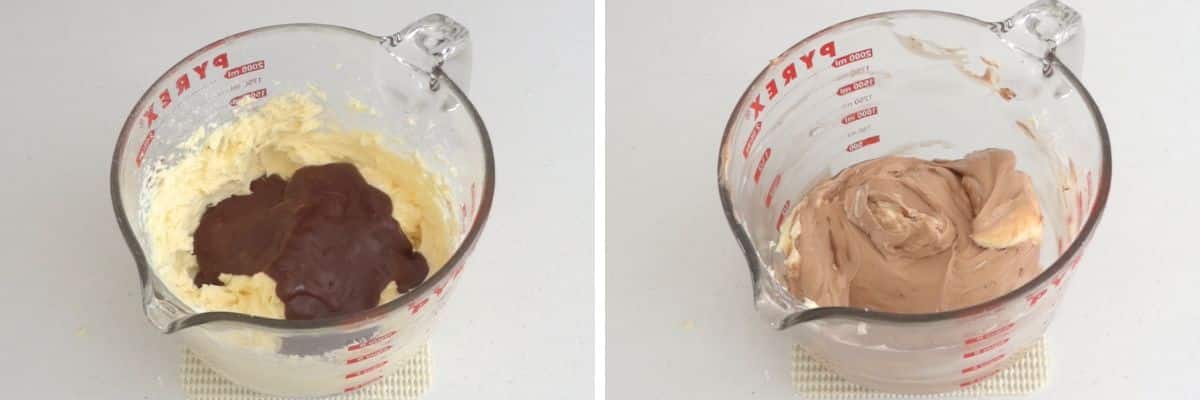
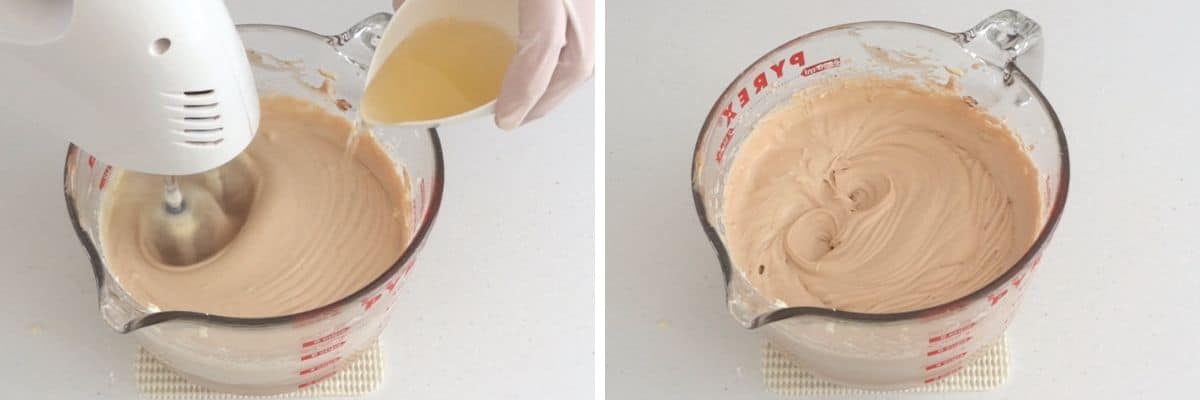
Whip cream cheese and powdered sugar together until smooth. This step is all about creating a silky, sweet base for your filling.

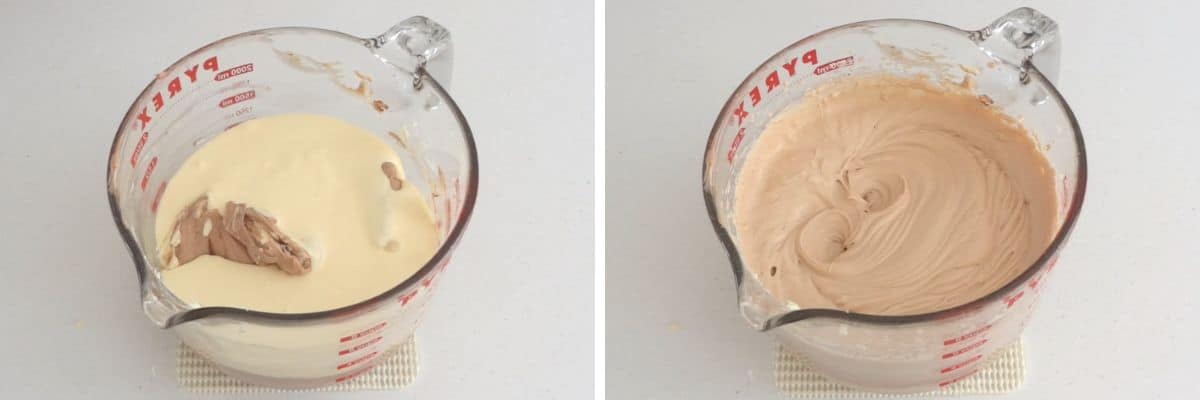
Combine the Mars bar mixture with the cream cheese mixture, beating thoroughly to ensure they're well blended. Then, pour all of the cream into the mixture in one go, mixing continuously until the texture becomes thick and uniform.
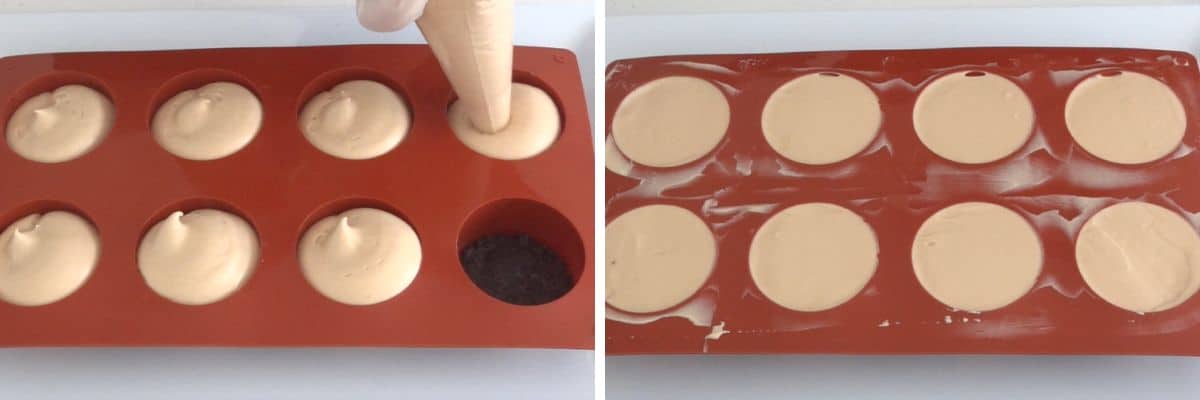
Finally, mix in the gelatine mixture. Pour this creamy, dreamy filling over your prepared bases, smoothing the tops as you go. A quick freeze will firm everything up, ready for topping. Freeze until set, preferably 6 hours or overnight.
Prepare Chocolate Decorations:
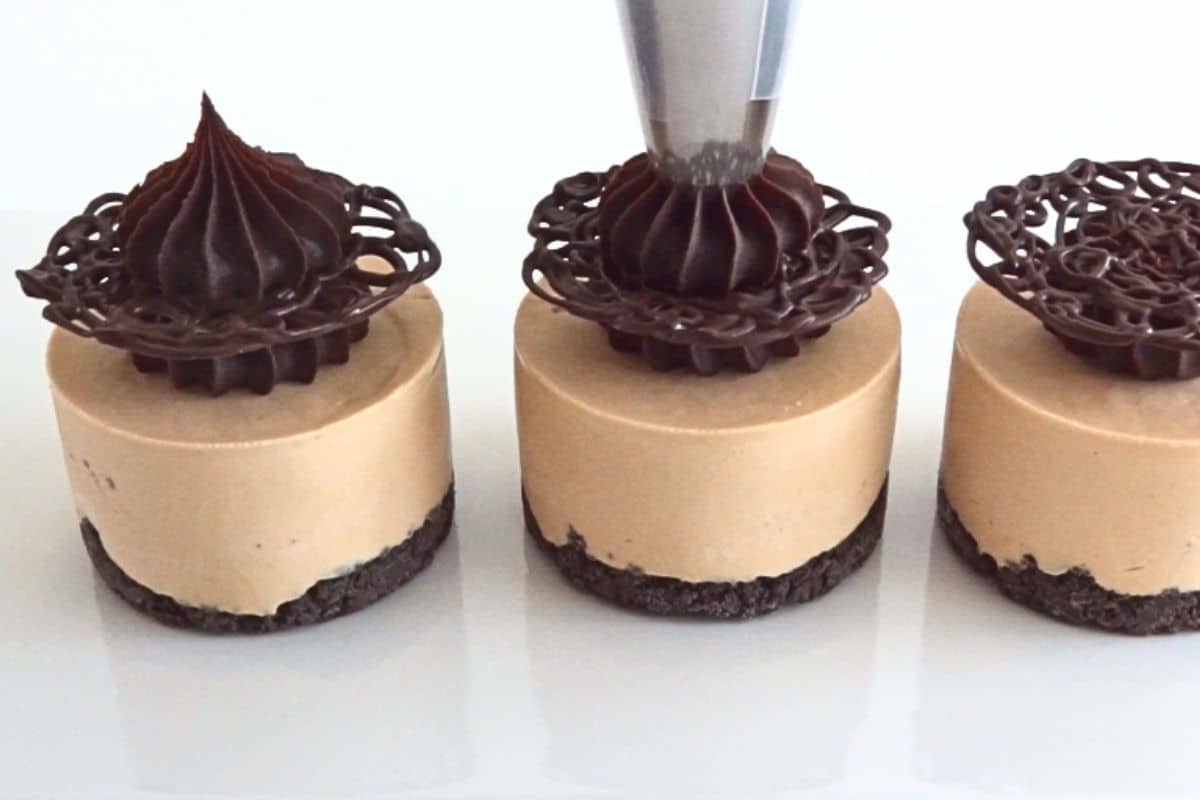
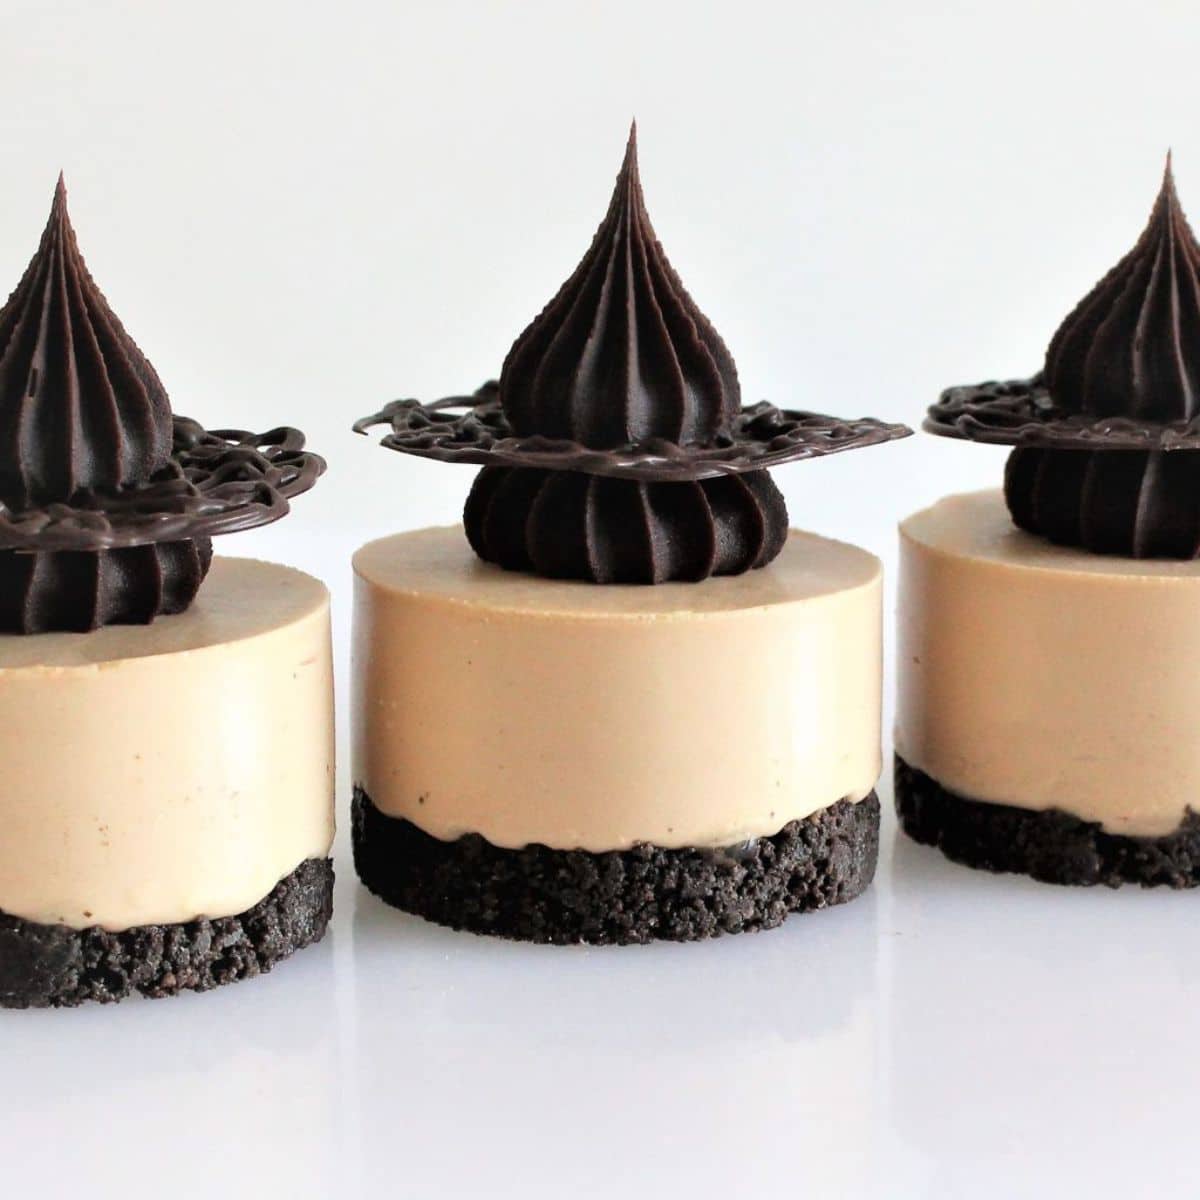
Melt dark chocolate. Pipe onto parchment paper in circle shapes with a squiggle pattern. Chill until firm.

Make Truffle Ganache Kisses:
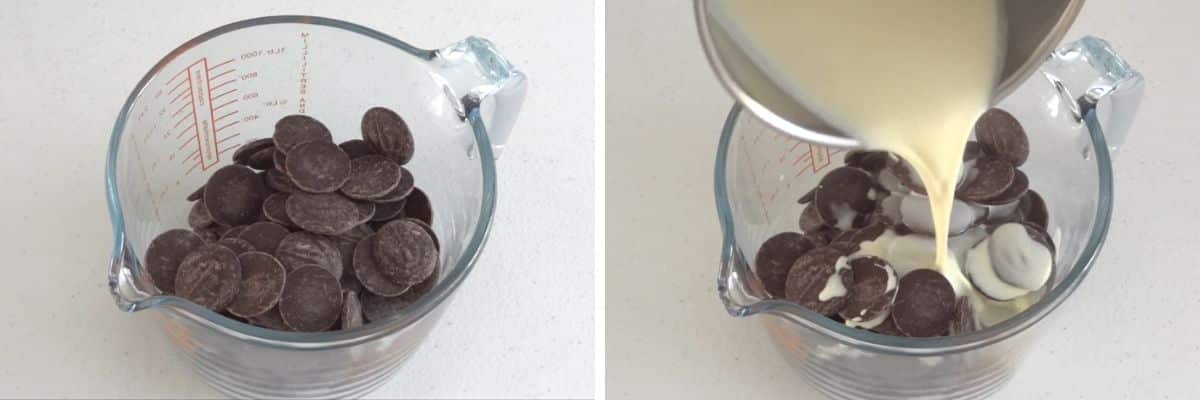
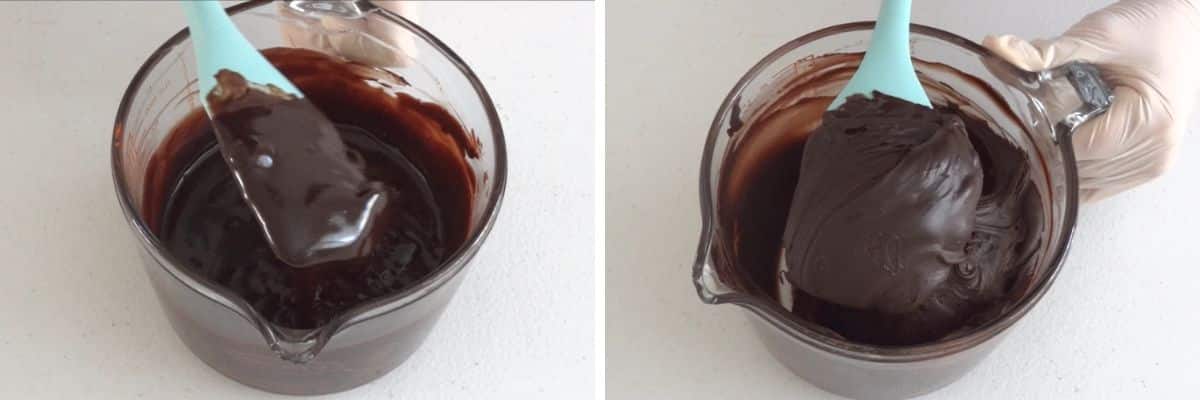
Pour hot cream over chopped dark chocolate, let sit, then stir until smooth. Cool to room temperature, then refrigerate, stirring every 10 minutes.
Begin the decoration process by using a French star piping tip to pipe a ganache kiss directly onto the center of each cupcake. Then, gently place a chocolate circle decoration on top of the first ganache layer, pressing lightly to secure it in place. Finish the decoration by piping another ganache kiss on top of the chocolate circle using the same French star tip for a consistent and elegant appearance. This method is outlined in the video for further guidance.
Thaw Before Serving:
Thaw the mini mars bar cheesecakes in the refrigerator for a few hours before serving.
My Top Tip
Here's a top tip for you: When melting your Mars bars and cream together, keep the heat low and stir constantly. This little bit of patience pays off big time by preventing the chocolate from seizing or burning, which can easily happen if it gets too hot too fast. This way, you'll get a perfectly smooth and creamy mixture that'll blend seamlessly into your cheesecake filling. Trust me, taking it slow here makes all the difference in getting that dreamy texture we're after.

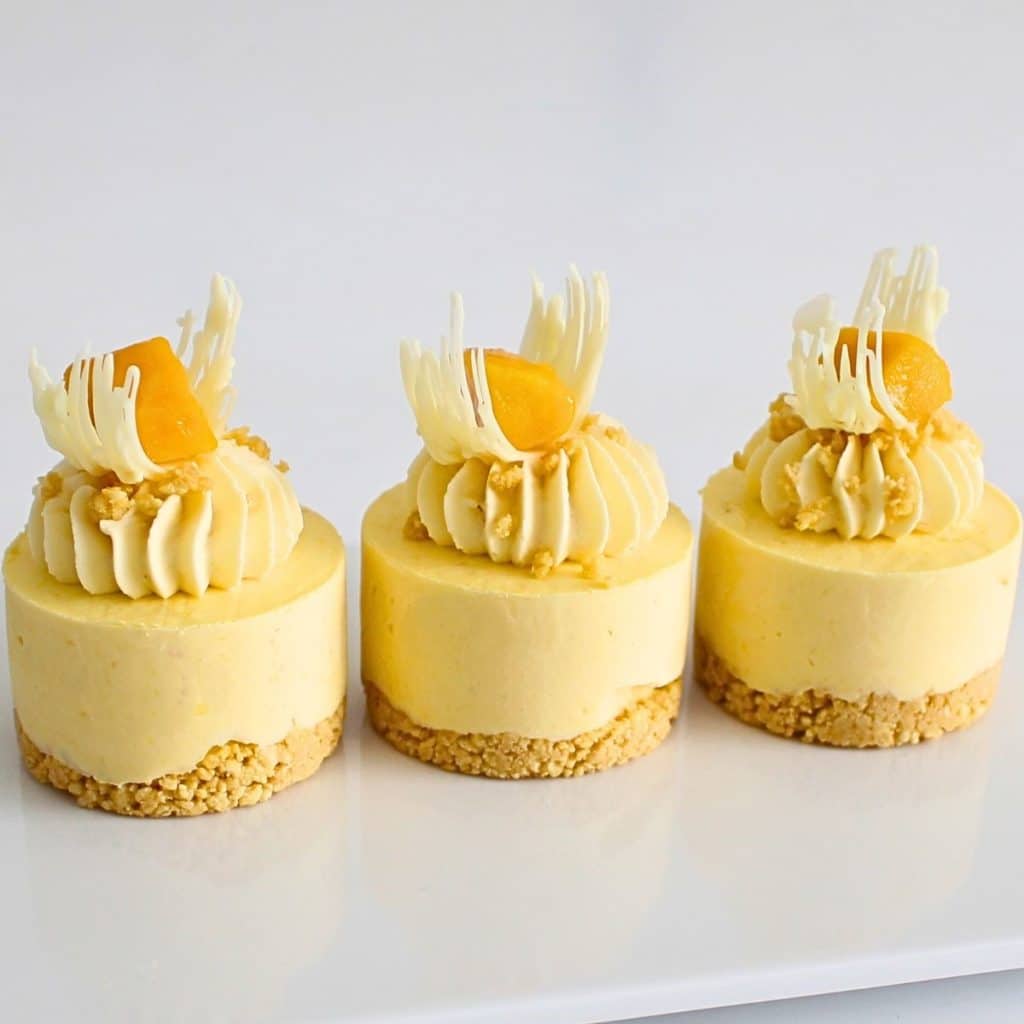
Some Suggestions For Alternate Garnishes
Garnish with Fresh Berries: Top each of the mars bar cheesecakes with fresh raspberries, strawberries, or blueberries for a burst of color and a fresh, tangy contrast to the rich chocolate.
Dust with Cocoa Powder: A light dusting of cocoa powder can add a sophisticated finish and a deeper chocolate flavor.
Whipped Cream: A dollop of whipped cream on top of each cheesecake can add a light and airy texture.
Drizzle with Caramel Sauce or Chocolate Hot Fudge Sauce: For extra indulgence, a drizzle of Caramel Sauce or Chocolate Hot Fudge Sauce over each of the mini cheesecakes can enhance the overall flavor profile.
More Cheesecakes You Might Like


Common Questions
Absolutely! Feel free to get creative and substitute with your favorite chocolate bars. Just keep in mind that different chocolates may alter the sweetness and texture slightly.
No worries if you don’t have a French star piping tip. You can use any piping tip you have on hand, or even cut the corner off a plastic bag for a DIY piping bag. The ganache will still taste delicious, even if the pattern is different.
Yes, these cheesecakes are perfect for making ahead. You can prepare and freeze them a few days in advance. Just remember to thaw them in the refrigerator for a few hours before serving.
Leftover cheesecakes can be stored in an airtight container in the refrigerator for up to 5 days. You can also freeze them for longer storage, just be sure to wrap them well.
Make sure to dissolve the gelatine thoroughly in hot water and mix it well with the other filling ingredients. Freezing the cheesecakes as instructed should then ensure they set nicely.
Mini Mars Bar Cheesecakes
INGREDIENTS
Base
- 265g (112 ⅙ oz) chocolate cookies plain or cream filled
- 100 g (3 ½ oz) butter unsalted, melted
Mars Bar Filling
- 2 teaspoon (2 teaspoon) gelatine
- 2 tablespoon (2 tablespoon) water hot from the kettle
- 3 (3) milky way or 8 minis - mars bars
- 2 tablespoon (2 tablespoon) heavy cream
- 375 g (1 ⅔ cups) cream cheese
- ¾ cup (¾ cup) powdered sugar
- 1 teaspoon (1 teaspoon) vanilla
- 400 ml (1 ⅔ cups) heavy cream
Chocolate Decorations
- ½ cup (½ cup) dark chocolate or compound chocolate
Truffle Ganache Kisses
- 300 g (1 5/7 cups) dark chocolate
- 150 g (⅝ cups) heavy cream
EQUIPMENT
- Mini Round Silicone Moulds
- Stick Blender
- 18 Inch Piping Bags
INSTRUCTIONS
Base
- Crush the Oreos or biscuits into fine crumbs using a stick blender or wooden rolling pin.
- Mix with melted butter until well combined.
- Press the mixture into the base of a cupcake tray lined with baking cups or 8 Cavity Silicone Moulds. This ensures easy removal of cheesecakes after freezing.
- Chill in the fridge to set while you prepare the filling.
Mars Bar Filling
- In a small bowl, dissolve the gelatine in boiling water and stir well with a mini whisk. Set aside.
- Chop the Mars Bars into small pieces.
- In a saucepan, combine Mars Bar pieces and 2 tablespoons of cream. Melt over medium heat, stirring occasionally. Remove from heat once melted and smooth.
- In a mixing bowl, beat together the cream cheese and powdered sugar until smooth.
- Add the melted Mars Bar mixture to the cream cheese and mix well.
- Add the vanilla and heavy cream and begin to mix.
- Gradually add the gelatine mixture. Mix until everything is well combined and smooth.
- Pour or spoon the Mars Bar filling over the biscuit base in each cup.
- Smooth the tops with an angled spatula or the back of a spoon.
- Chill in the freezer until set, usually about 6 hours or overnight depending on your freezer.
Chocolate Decorations
- Melt the chocolate in a heatproof bowl over a pot of simmering water or in short bursts in the microwave, stirring until smooth.
- Transfer the melted chocolate to a 14 inch piping bag. If you don't have a piping bag, you can use a small ziplock bag and snip off a tiny corner.
- Pipe the melted chocolate onto the parchment paper to form small circles, each about the size of a coin. While piping the circles, add a little squiggle pattern to each for a decorative touch. This can be seen in the video.
- Let these chocolate decorations set in the fridge until firm. This should take about 10-15 minutes.
Truffle Ganache Kisses
- Pour the hot cream over the chopped chocolate. Let it sit for a minute to gently melt the chocolate.
- Stir the mixture until the chocolate is completely melted and the mixture is smooth.
- Allow the ganache to cool to room temperature. Once cooled, refrigerate it.
- Stir the ganache every 10 minutes while it's in the refrigerator. This helps to prevent it from setting too hard and maintains a smooth texture.
- Once the ganache is thick enough to pipe but still soft, transfer it to a piping bag fitted with a large French star tip.
- Pipe a ganache kiss directly onto each cupcake, Place a chocolate circle decoration on top of the ganache kiss pressing gently.
- Finish off by piping another ganache kiss on top of the chocolate decoration. This can be seen in the video.
Thaw
- Place decorated cheesecakes on a platter uncovered in the refrigerator for a couple of hours to thaw before serving.
NUTRITION
Video Tutorials More Mini Cheesecakes


Bayo Ann says
Hi how long can I make these in advance and how best to keep them I. e. fridge or freezer thanks
Fay says
Hello! You can definitely make these ahead of time which is one reason I love them! They can stay for a couple of weeks in the freezer in their mould before you unmould and decorate them. Just be sure to keep the filled moulds covered so they don't absorb odours from the freezer or develop freezer burn. Once they have been taken out and decorated, they will last 3 days in the refrigerator in an air-tight container. I hope this helps.
Gulfira Ballack says
Hello!
Could you suggest a cookie recipe to use instead of Oreo cookies, do not like products full of chemicals
Thank you
Fay says
Hi Gulfira! You can swap out the cookies for any cookies you like. Homemade ones work well. I have a couple at this link https://cupcakesavvyskitchen.com/category/cookies/ If you want them chocolate. just swap out 2 tablespoons of the flour for cocoa powder.
Connie says
Hello. I'm thinking of making these. They look so good. One quick question. Once the Mars bar filling has melted, do you add it to the cream cheese right away or does it have to come to room temperature before adding to cream cheese. Thank you.
Fay says
Don’t add it right away. It can be added warm. No need to fully come to room temp. Would love to hear how it goes.
Connie says
Hi Fay. I did make them and they were delicious. Everyone was very impressed with the decorations. I had a few left over already decorated with the ganache and the chocolate decorations. Can I refreeze?
Fay says
That's great! They can be frozen. The cheesecakes and ganache freezer well. There is a chance the chocolate may wilt or "bend" when it defrosts.
Connie says
Thanks. Good to know. alternatively is it possible to make these in dessert cups then freeze or is the dessert cup plastic too delicate? Thanks again.
Fay says
You can definitely to that, just be sure they are freezer-safe before purchasing.
Connie says
Hi. I would love to try your mini mars bar cheesecakes for my daughter’s bridal shower. Is it possible to provide me with a link for the 8 cavity silicone mould that you used? Thank you
Fay says
Sure thing Connie! I have added an equipment section with links in the recipe card. Congratulations on your daughter's impending marriage. So exciting!
Connie says
Can I make these a day or two ahead and serve them the by the third day without putting them in the freezer at all? Will they set properly? Thank you.
Fay says
They will set but you won’t be able to remove them from the mould without damage. The freezing allows for clean removal.
Connie says
Oh, sorry my mistake. I was thinking of just making them straight in a mini dessert cup and just leaving them to set in the fridge and to be eaten straight out of the cup. Would that work?
Fay says
Yep! No problem at all.
Nemat ayoub says
I like your recipe and the way of explaining it.very wonderful ,clear and detailed recipes.thank you from my heart.i love you a lot.it is my pleasure to see your recipes.god bless you .wish you the best ,dear.
Fay says
Thank you. I am happy you are enjoying my recipes 🙂