
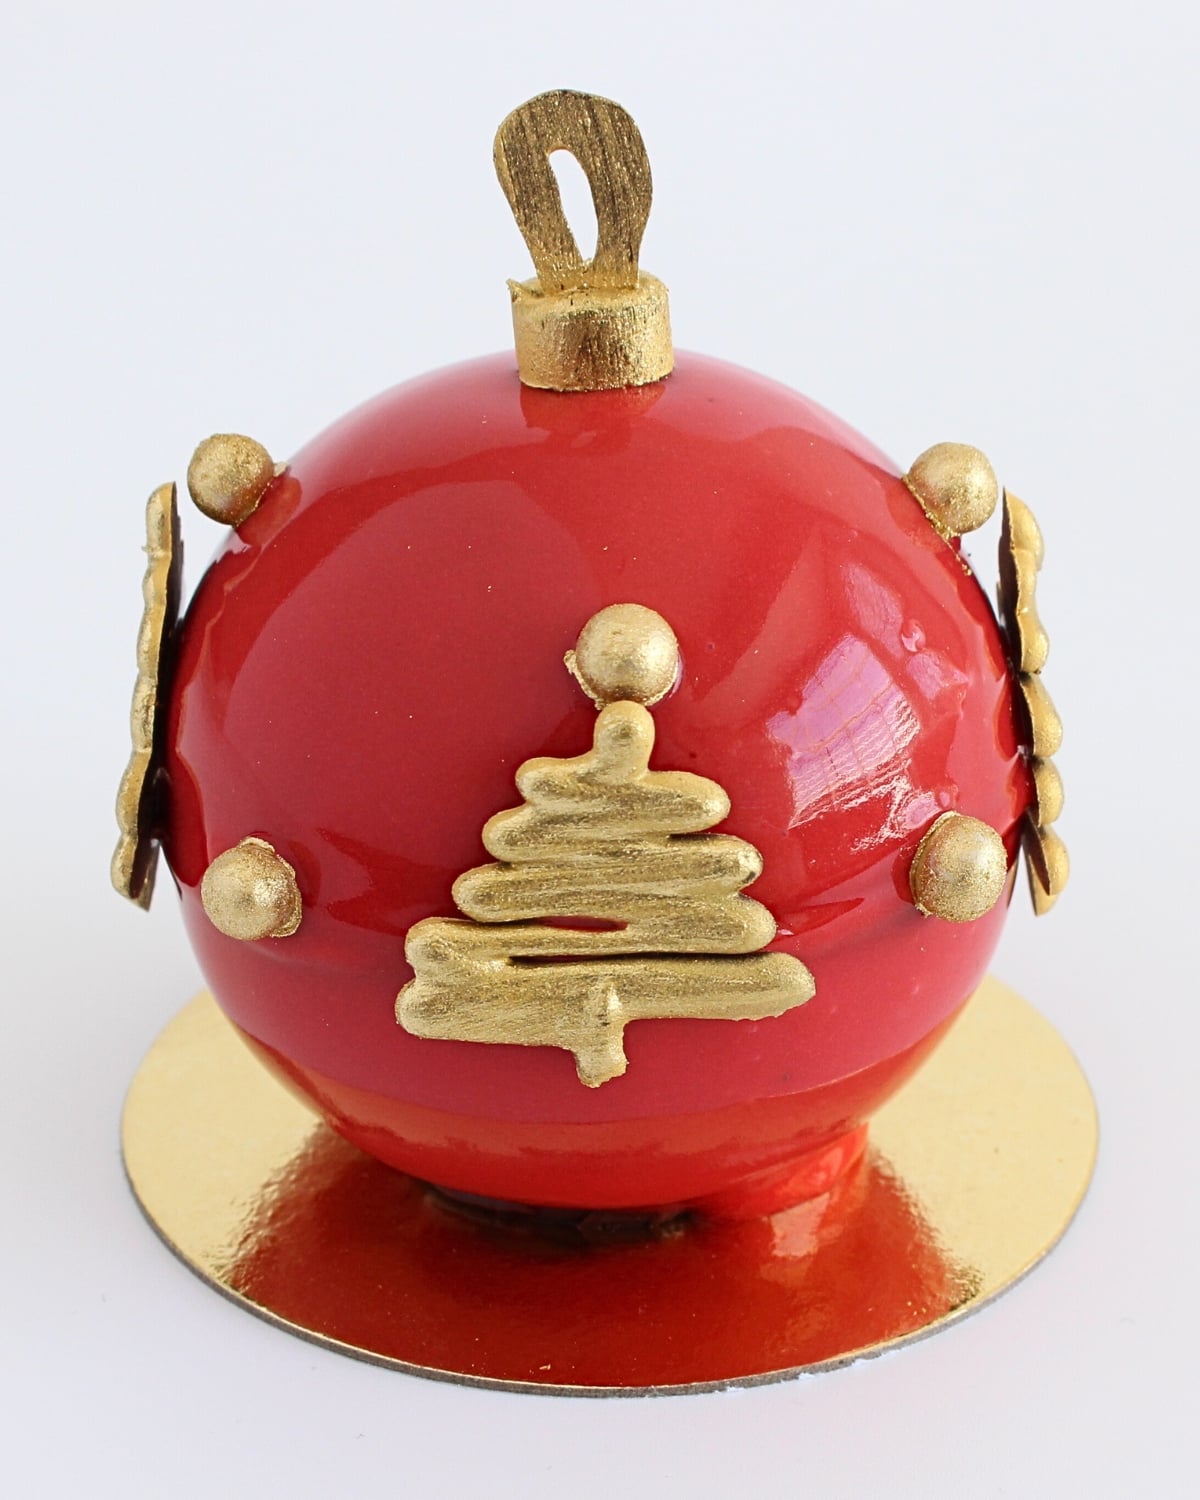
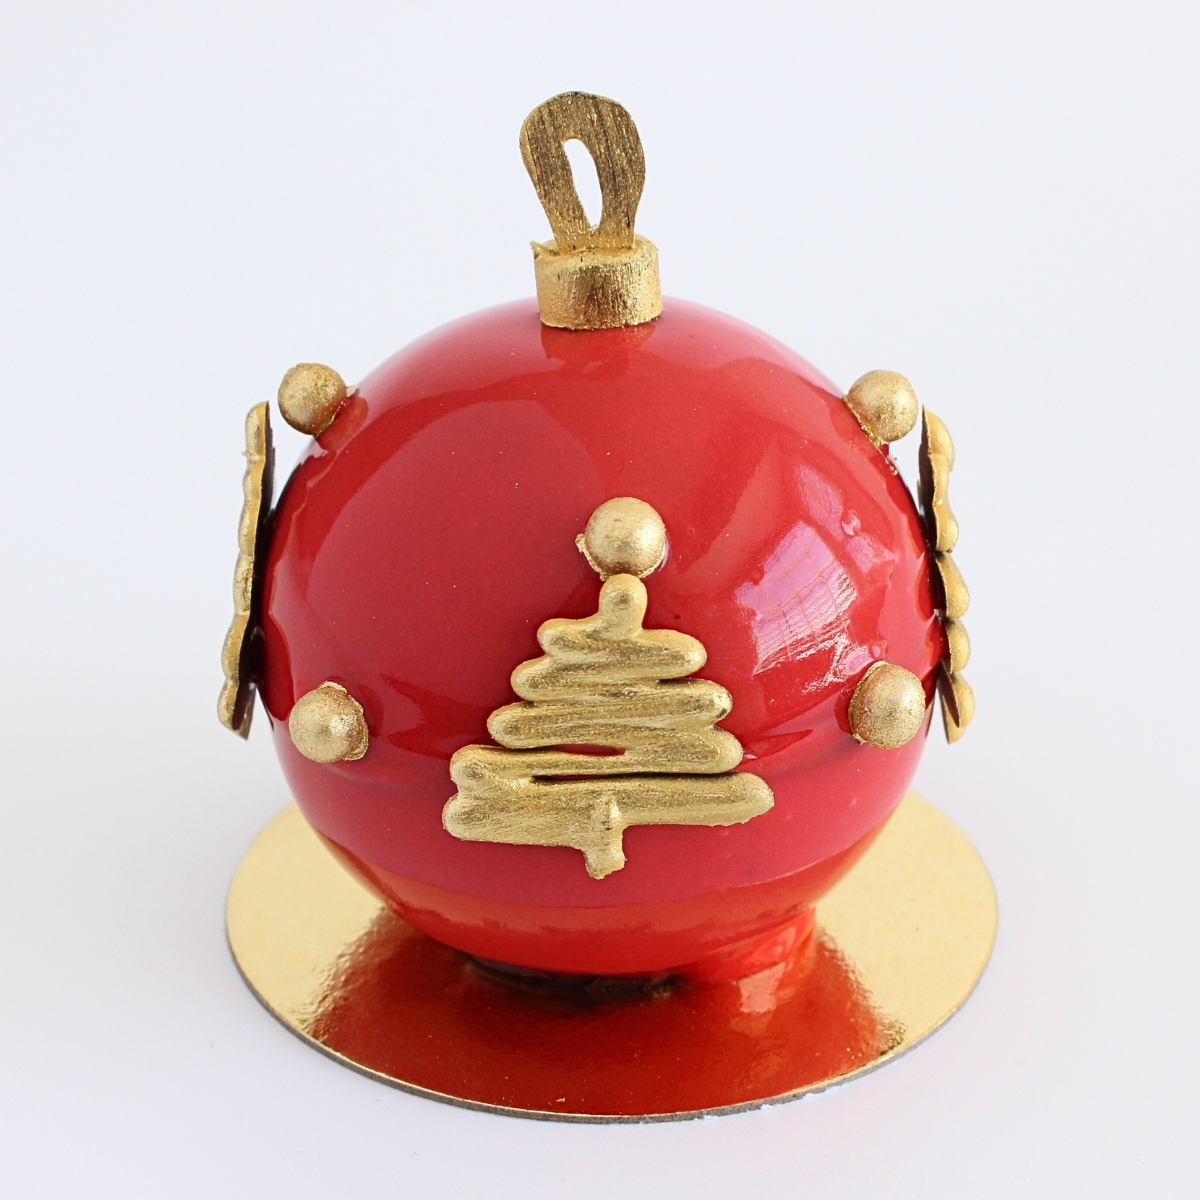
This Mirror Glaze Christmas Ornament Dessert always stands out as a holiday dessert because the glossy red mirror glaze sets so cleanly over the frozen chocolate cream center. The raspberry layer gives the whole dessert a bright pop that balances the rich chocolate. It feels very entremet style but stays simple enough to prepare in stages If you enjoy shiny mirror glaze desserts, you might also like my Mini Tiramisu Cheesecakes with a Shiny Mirror Glaze.
SUMMARISE AND SAVE THIS RECIPE
Why You’ll Love This Recipe
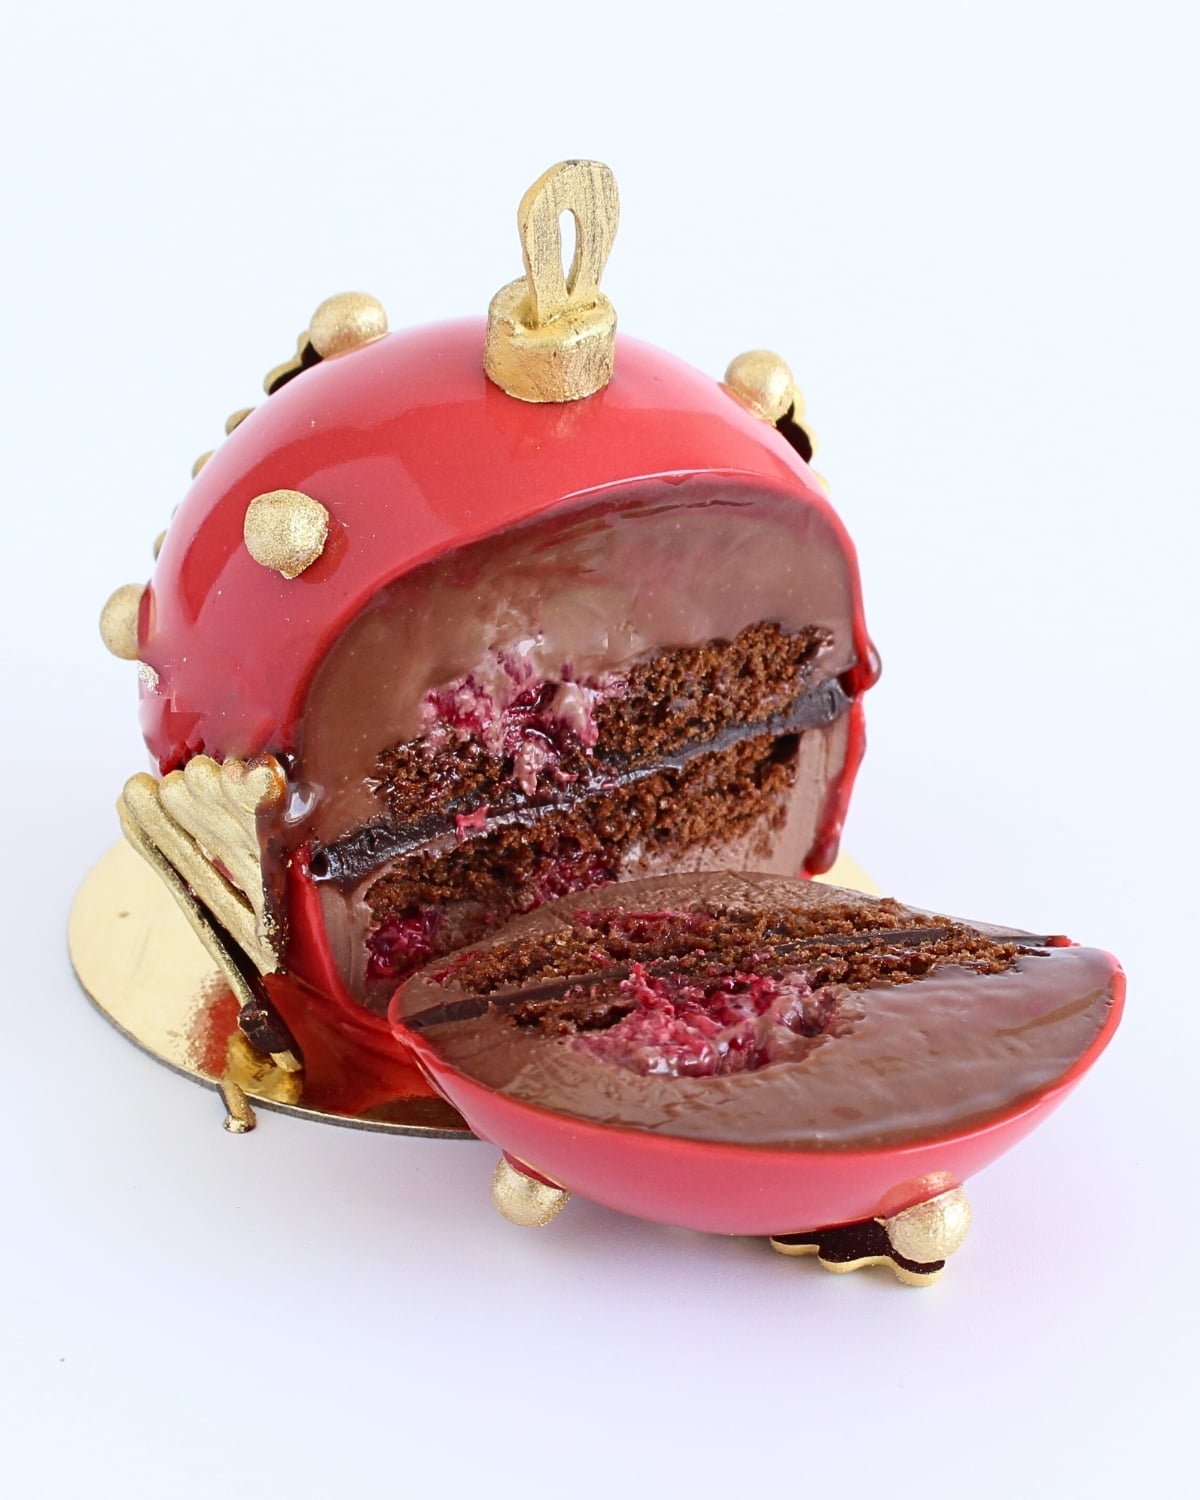
I love this one because it looks so pretty on the table and the inside tastes even better than it looks. The chocolate cream with the raspberry works so well with the shiny red glaze. You get smooth, cold, creamy, chocolatey, fruity and a bit of crunch all in one bite. I also like that you can make each part ahead, so the whole thing feels way more relaxed when you put it together. I also do a similar chocolate finish in my Mirror Glaze Chocolate Mousse Bars and it always looks so clean once sliced.
Ingredient Notes for This Christmas Ornament Dessert
- Dark chocolate: I use good quality dark chocolate because it sets cleanly and tastes richer in the filling and decorations.
- Heavy cream: This gives the filling a smooth, creamy texture. It blends well with the melted chocolate.
- Gelatin: Blooming the gelatin helps the filling set so the ornaments hold their shape once frozen.
- Chocolate cookies: I use Choc Ripple cookies when I make this in Australia. Any plain chocolate cookie works for US readers.
- Frozen raspberries: They add a bright fruity layer that cuts through the chocolate and tastes so good once the ornaments thaw.
- White chocolate: This melts into the glaze and gives it a glossy, smooth finish once blended.
- Glucose syrup: This keeps the glaze shiny and helps it pour in an even layer over the frozen ornaments.
- Sweetened condensed milk: This creates that smooth, silky mirror finish and blends easily with the white chocolate.
- Red gel food colour: Gel works best because it gives a strong colour without breaking the glaze.
- Edible gold luster dust or gold spray: You can brush or spray this over the chocolate decorations to give them a gold look. If you use yellow or gold oil based chocolate colouring in the melted chocolate, you don't need extra colour.
- Ganache: This acts as the glue that holds the two halves together before glazing.
- Chocolate decorations: These add the little ornamental details and make the whole dessert look like a real Christmas ornament.
How to Make This Mirror Glaze Christmas Ornament Dessert
You'll see each step broken down so you can make this Mirror Glaze Christmas Ornament Dessert at home. I walk you through the chocolate decorations, the chocolate raspberry filling, the red mirror glaze, and the full assembly so you can make these ornaments at home without stress.
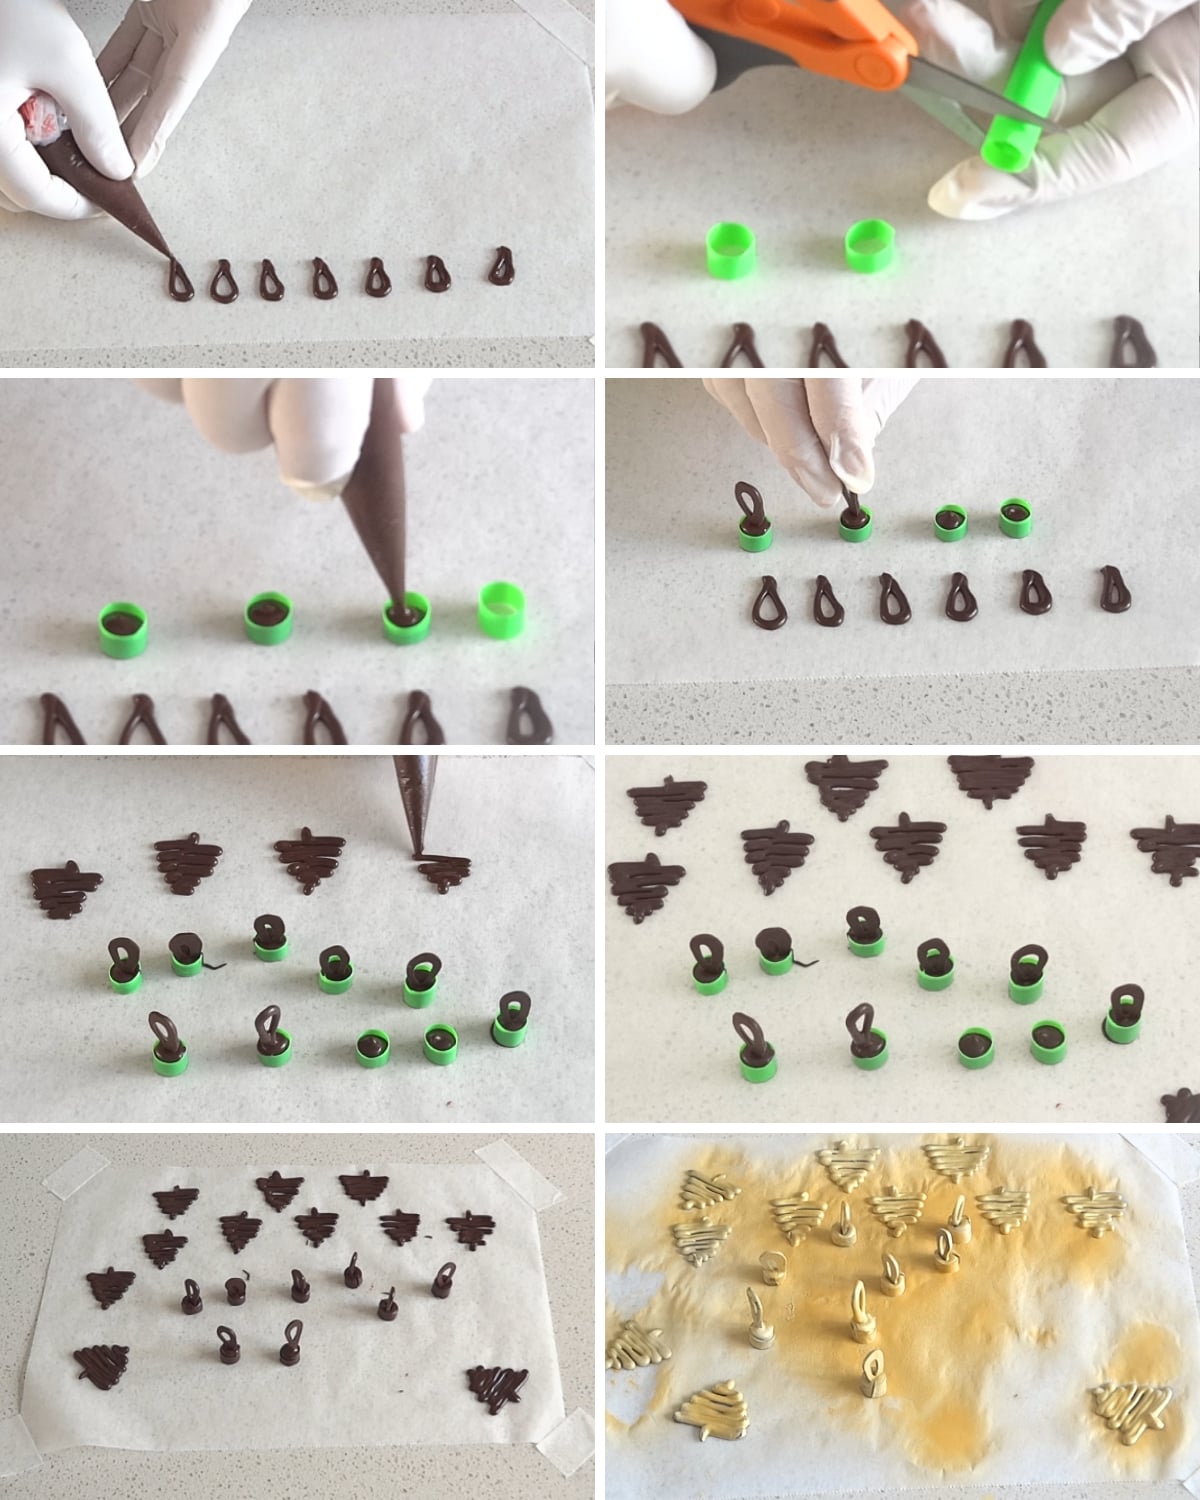
Chocolate Decorations
- Melt your dark or milk chocolate and spoon it into a piping bag.
- Pipe small teardrop shapes onto baking paper. These form the loops.
- Cut small pieces of bubble tea straw or silicone mould tubing.
- Pipe chocolate around the outside of each tube to create the gold cups. Let them set.
- Pipe Christmas tree shapes, circles, or simple shapes you like onto baking paper.
- Chill everything until firm.
- Brush each piece with edible gold luster dust.
- To attach the loops to the cups, dab a little melted chocolate inside the cup and hold the loop upright for a few seconds until it stays on its own.
Chocolate Raspberry Filling
This is the rich center of each ornament. It freezes well and slices cleanly while keeping the raspberries bright.
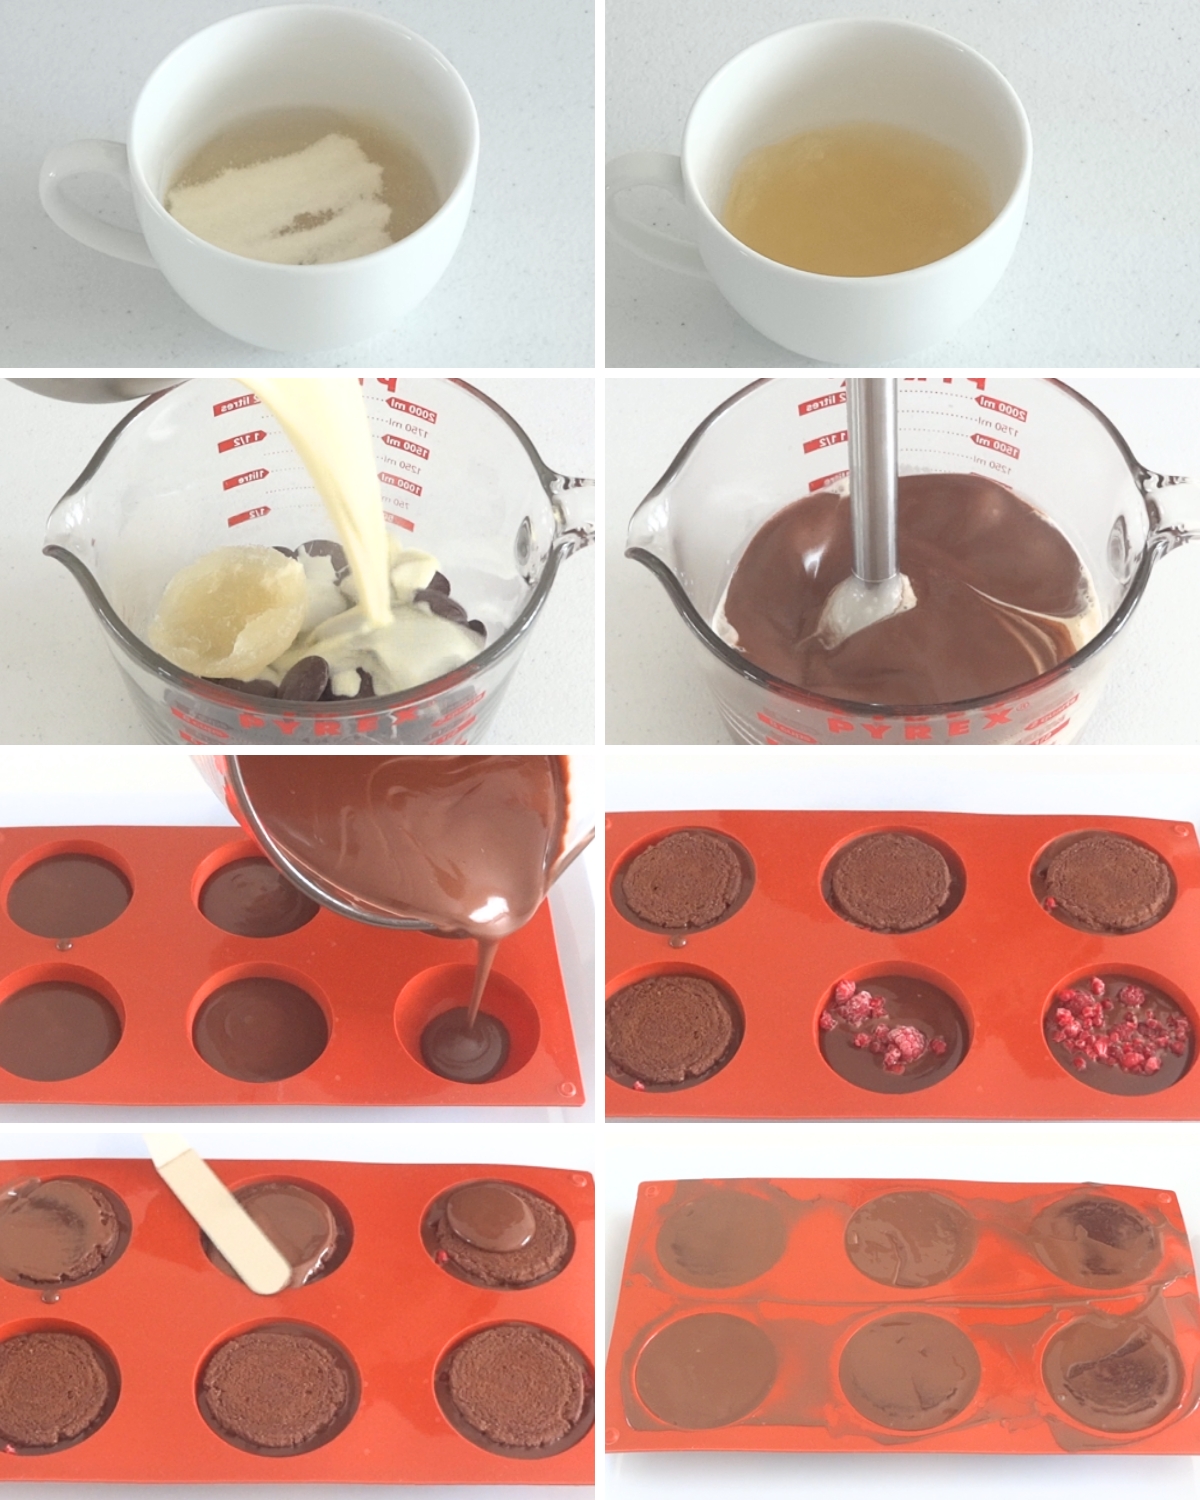
- Bloom the gelatin in cold water and let it sit.
- Add chocolate, cream, and the bloomed gelatin to a heatproof jug.
- Blend with an immersion blender until smooth.
- Pour a small amount into each silicone mould cavity.
- Add a layer of crushed raspberries.
- Top with the remaining chocolate mixture.
- Add the baked cookie round on top and press it in gently.
- Freeze the mould overnight or until completely solid.
Ganache "Glue"
You only need a small amount. It holds the two frozen halves together and helps keep the ornaments stable.
- Add chocolate and cream to a microwave safe bowl.
- Heat for 30 seconds and stir until smooth.
- Warm again in short bursts if needed.
- Let it cool until slightly thick. You want it spreadable, not hot.
Red Mirror Glaze
This glaze is glossy and smooth. It pours best when the ornaments are frozen and the glaze is at the right temperature.
- Bloom the gelatin in cold water.
- Add condensed milk, white chocolate, and the bloomed gelatin to a heatproof jug.
- In a saucepan, heat glucose, water, and sugar over low heat until dissolved.
- Bring it to a boil and cook for one minute or until it reaches 103C or 217F.
- Pour the hot syrup over the chocolate mixture.
- Let it sit for five minutes, then blend with an immersion blender.
- Add red gel food colour and blend again, keeping the blender fully submerged to avoid air bubbles.
- Let the glaze cool to 32C to 35C or 90F to 95F.
- It must be poured over fully frozen ornaments so it sets on contact.
If you want another example of this exact glaze temperature, check out my Speckled Robin's Egg Cheesecake Recipe with a beautiful blue mirror glaze.

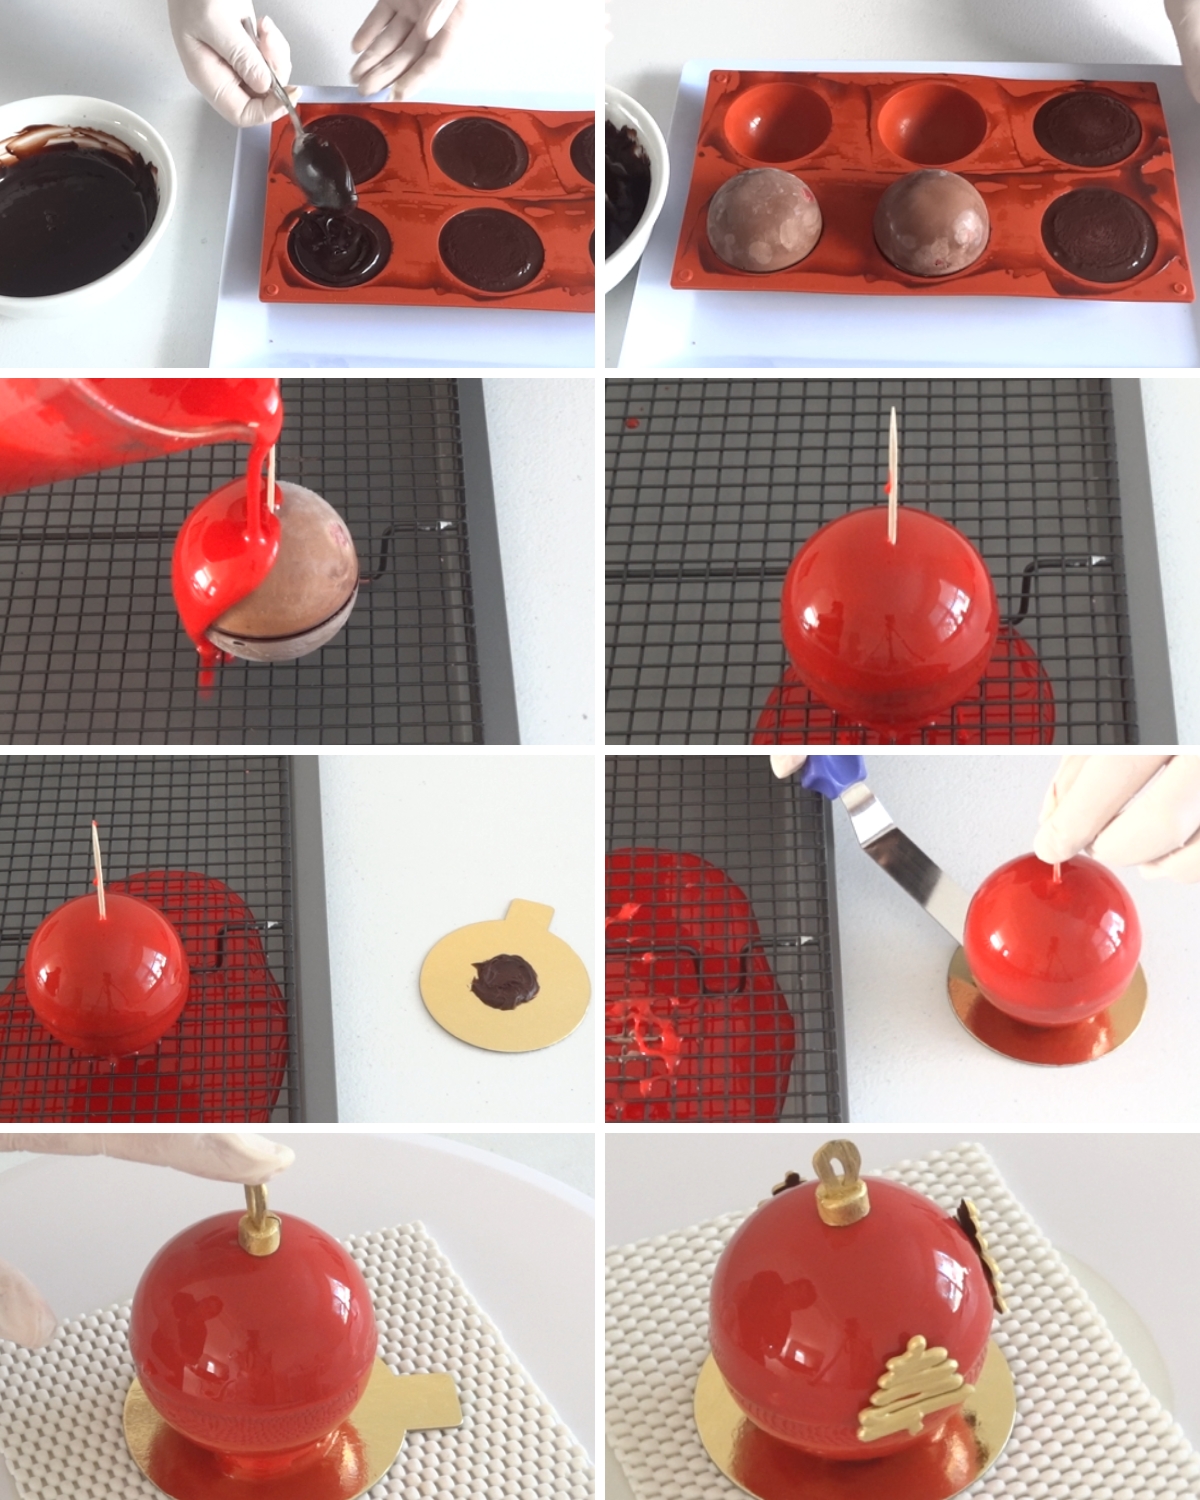
Decorating Your Mirror Glaze Christmas Ornaments
This is where everything comes together. Your ornaments must be fully frozen, the ganache should be spreadable, and the glaze should be at pouring temperature. Once those things are ready, the assembly moves quickly and smoothly.
- Remove the frozen halves from the freezer.
- Spread a thin layer of cooled ganache over one half.
- Place the second half on top to form the full sphere.
- Insert a toothpick into the top and place each ornament on a rack set over a tray.
- Pour the red mirror glaze over each frozen ornament.
- Let the glaze drip for a few minutes.
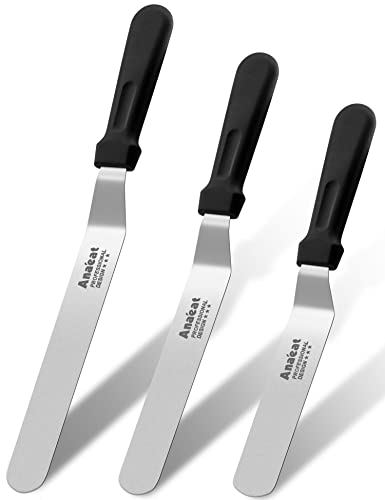
- Lift each ornament using the toothpick with a small angled spatula under the base.
- Scrape away any drips on the bottom, then place the ornament on a small dab of ganache on a cake board or plate so it doesn't roll.
- Refrigerate the ornaments for at least two hours before serving so the centre can soften.
Pro Tips
These little tricks help everything come together without stress and give you a clean, shiny finish.
- Work with fully frozen halves so the glaze sets fast and smooth.
- Keep the glaze between 32C and 35C so it pours in one even layer.
- Use a toothpick in the top of each ornament to move them without denting the glaze.
- Warm your ganache slightly if it sets too firm to spread.
- Let the finished ornaments sit in the fridge for at least two hours before serving so the centre softens.
Storage Tips
You can prep these ahead which makes the whole project feel much easier.
- Keep the filled half-spheres in the freezer for up to one month before glazing.
- Store finished glazed ornaments in an airtight container in the fridge for two to three days.
- Avoid stacking them because the glaze can mark if something presses against it.
- Freeze unglazed decorations separately in a small container if you want to make them early.
- Don't freeze fully glazed ornaments because the colour can lose its shine once thawed.
Variations
You can swap a few parts of this recipe to match your own taste or what you have on hand.
- Use milk chocolate instead of dark chocolate for a sweeter filling.
- Add fresh raspberries instead of frozen if you are serving the ornaments the same day.
- Make a white chocolate filling by swapping the dark chocolate for white chocolate and reducing the sugar slightly.
- Use different colours in the glaze if you want a theme that is not Christmas.
- Skip the cookie layer if you want a softer centre with no crunch.
- Make smaller ornaments by using mini silicone molds and adjusting the filling amount.
If you enjoy learning more about mirror glaze techniques, here's a quick resource I like to look at. If you want to see where the modern mirror glaze trend was first popularized in professional pastry, Christophe Michalak shares some beautiful examples on his Instagram page.
FAQs About This Mirror Glaze Christmas Ornament Dessert
Yes. You can make the ornaments up to two days earlier and keep them frozen. Glaze them while frozen, then chill until serving.
The ornaments must be fully frozen and the glaze must be at the right temperature. If the glaze is too warm or the surface is soft, it won't set.
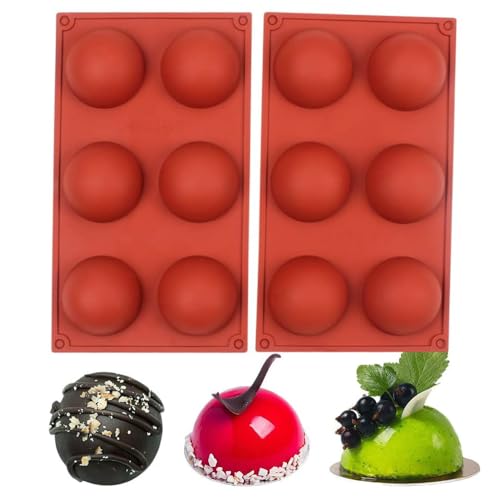
You need round silicone molds so the ornaments set cleanly. They also help the glaze spread smoothly.
Yes. Use gel food color. Red works well for Christmas, but any shade fits the dessert.
I thaw them in the fridge for about two hours. The glaze stays shiny, and the center softens just enough to cut cleanly.
I use good quality dark chocolate or baker's chocolate because it hardens quickly and holds its shape.
Yes. Mirror glaze desserts look polished and have a rich center, so they suit holiday tables and special bakes.
They are easier once you understand glaze temperature and freezing. Each step is simple when done in stages.
Yes. A well-emulsified glaze stays shiny for days. Keep the glazed ornaments refrigerated and avoid touching the surface. The shine actually gets better as the glaze sets fully.
Yes. You can use the glaze on cakes, small domes, or any frozen dessert.
Make It ✨ Snap It 📸 Share It! 🍨(Tag @CupcakeSavvysKitchen)
If you whip up one of my desserts, I'd love to see it! 😍 Tag me on Instagram or Facebook so I can check out your creation. I'll be reposting my favorites and giving shout-outs in my stories! 🎉
🎥 You can also find full dessert video tutorials on my YouTube channel. I post new dessert recipes there all the time, so come join me in the kitchen on YouTube!
It's always fun to see your unique twists on my recipes, so don't be shy, snap a pic and share it! 📢🍰 #CupcakeSavvysKitchen
Mirror Glaze Christmas Ornament Dessert
INGREDIENTS
Chocolate Decorations
- 100 g (3.5 oz) dark chocolate melted
- edible gold luster dust or edible gold spray
Chocolate Cream Filling
- 3 teaspoon (teaspoon) gelatin
- 2 tablespoon (tablespoon) water cold
- 225 g (9 oz) dark chocolate use a chocolate you enjoy eating
- 600 ml (2½ cups) heavy cream
- 12 chocolate cookies Arnott's Choc Ripple biscuits for Australia
- 6 tablespoon (tablespoon) raspberries frozen or fresh
Ganache Glue
- 80 ml (3 oz) dark chocolate
- 40 ml (2½ tablespoon) heavy cream
Red Shiny Mirror Glaze
- 100 ml (⅓ cup) water
- 140 g (½ cup) sweetened condensed milk
- 200 g (⅔ cup) glucose
- 200 g (7 oz) white chocolate
- 200 g (1 cup) sugar
- 6 teaspoon (6 teaspoon) gelatin
- 120 ml (½ cup) water
- red food gel color
EQUIPMENT


INSTRUCTIONS
Chocolate Decorations
- Pour the melted chocolate into a piping bag. Snip a small opening.
- Pipe small loops onto baking paper.
- Cut a wide bubble tea straw into small pieces about 6 mm or one quarter inch long.
- Fill each straw piece with chocolate and let them set.
- Pipe small chocolate trees using a zig zag motion.
- Let them all set until firm.
- Push the set chocolate cylinders out of the straw pieces.
- Add a dab of melted chocolate to the top of each cylinder.
- Press a loop onto the chocolate and hold for a few seconds. The loop should stand on its own.
- Spray with edible gold or brush with luster dust if needed. Set aside for assembly.
Chocolate Cream Filling
- Add gelatine to cold water. Stir and let it bloom for 5 minutes.
- Heat the heavy cream to just under boiling.
- Add dark chocolate and bloomed gelatine to a heatproof bowl. Pour in the hot cream.
- Blend with an immersion blender until smooth.
- Fill 12 silicone hemisphere cavities. Leave a small gap at the top.
- Add frozen raspberries to each cavity. Place a cookie on top of the raspberries.
- Add a small amount of chocolate cream over the cookie. Smooth the surface.
- Freeze overnight covering after one hour to avoid freezer smells.
Ganache Glue
- Add gelatin to cold water and let it bloom for 5 minutes.
- Add white chocolate, condensed milk and bloomed gelatin to a heatproof jug. Set aside.
- Add glucose syrup, water and sugar to a saucepan.
- Stir over low heat until the sugar dissolves.
- Bring to a boil and let it boil for one minute.
- Remove from heat. Pour hot syrup over the chocolate mixture.
- Let it sit for 5 minutes then blend with an immersion blender until smooth NB: Keep the blender head under the surface to avoid air bubbles forming.
- Add red gel food color. Blend again until even.
- Let the glaze cool to 32°C - 35°C or 90°F - 95°F. This is the best pouring temperature.
Assembly
- Remove the frozen halves from the freezer.
- Spoon a thin layer of ganache onto six halves. Add another half on top to form full spheres. Press very gently to secure the join.
- Insert a toothpick into the top of each ornament.
- Place a wire rack over a tray.
- Stand each ornament on the rack.
Red Shiny Mirror Glaze
- Pour the mirror glaze over the ornaments right away while they are frozen solid.
- Leave to sit for two minutes to let the excess glaze drip into the tray.
- Add a small dab of ganache to each cake board.
- Lift each ornament using the toothpick. Slide an angled spatula under the base.
- Scrape off drips and transfer to the cake board and remove the toothpick.
- Press the gold chocolate hardware onto the top and sides before the glaze sets. Hold for a moment if needed.
- Refrigerate the ornaments for at least two hours to thaw before serving.
NOTES
- For the smoothest red mirror glaze finish, pour the glaze only when the ornaments are fully frozen. This helps the shiny glaze set instantly and keeps the color vibrant.
- The glaze temperature matters for a mirror effect. Aim for 32°C to 35°C (90°F to 95°F) so the coating flows in one clean layer without streaks.
- If the glaze slides off the frozen ornament dessert, it is slightly too warm. Let it cool and thicken before pouring again.
- If the glaze looks thick or loses its shine, warm it in short bursts so it returns to its glossy mirror texture.
- You can prep all chocolate decorations ahead of time. They stay firm, gold, and crisp, which works beautifully for Christmas ornament desserts.
- Gel food coloring gives the richest red for a Christmas mirror glaze without changing the texture.
- Frozen raspberries work best for the chocolate raspberry center because they hold their shape during slicing and give that classic entremet-style layer.
- A small dab of ganache acts as edible glue and keeps each ornament steady on a cake board or serving plate.
- Chill the finished ornaments for at least two hours before serving so the filling softens and the layers settle like a traditional mirror-glazed entremet.

Mel says
Such a stunning dessert! WOW!
Fay says
Thanks and honestly it is a lot easier to make than it looks!