
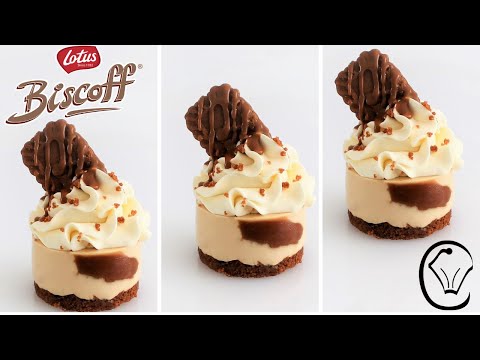
Mini Biscoff Cheesecakes are creamy, no-bake treats with a buttery cookie base. Each bite has smooth cheesecake filling and a swirl of Biscoff spread. Topped with whipped cream, a Biscoff cookie, and melted spread, they're irresistible! Mini Biscoff Cheesecakes are creamy, no-bake treats with a buttery cookie base. Each bite has smooth cheesecake filling and a swirl of Biscoff spread. Topped with whipped cream, a Biscoff cookie, and melted spread, they're irresistible!

SUMMARISE AND SAVE THIS RECIPE
Why You’ll Love This Recipe
- No-bake convenience: Skip the oven and whip these up in no time.
- Perfect portions: Individual servings mean no slicing or mess.
- Biscoff heaven: From the cookie crust to the drizzle, every layer is packed with the iconic Biscoff flavor.
Why Silicone Moulds Work Well
Silicone molds are ideal for this recipe because their flexibility makes it easy to release these delicate Mini Biscoff Cheesecakes without cracking or damage. Once frozen, the cheesecakes pop out effortlessly with a gentle push, keeping their smooth edges and perfect shape intact.
Are Silicone Moulds Necessary?
Silicone molds aren't strictly necessary for this recipe. You can make the mini cheesecakes using a standard cupcake tray lined with baking cups. The liners help with easy removal while keeping the cheesecakes intact.

Ingredients for Mini Biscoff Cheesecakes
Crumb Base
- Biscoff Biscuits: These spiced cookies create a flavorful and crunchy base for the cheesecakes.
- Unsalted Butter: Combines with the cookie crumbs to bind the base together and add richness.
Cheesecake Filling
- Gelatine: Provides structure to the no-bake cheesecake, helping it hold its shape.
- Boiling Water: Dissolves the gelatine, making it easier to incorporate into the filling.
- Cream Cheese: The main ingredient for the cheesecake layer, providing a creamy and tangy base.
- Powdered Sugar: Sweetens the filling without adding grittiness.
- Vanilla Extract: Enhances the flavor and complements the Biscoff spread.
- Biscoff Spread: Adds the signature spiced flavor and creamy texture to the filling.
- Heavy Cream: Adds richness and helps create a smooth, airy texture in the filling.
- Extra Biscoff Spread: Smeared inside the molds for an extra burst of flavor.
Topping
- Heavy Cream: Whipped to make a light and fluffy topping.
- Powdered Sugar: Sweetens the whipped cream without overpowering it.
- Vanilla Extract: Adds flavor to the whipped cream, tying it into the overall dessert.
Garnish
- Reserved Cookie Crumbs: Adds a decorative touch and ties the garnish to the base flavor.
- Biscoff Cookies: One for each mini cheesecake, serving as a fun, edible decoration.
- Melted Biscoff Spread: Drizzled over the top for flavor and visual appeal.
How To Make Mini Biscoff Cheesecakes
1. Prepare the Crumb Base:
Crush the Biscoff biscuits into fine crumbs using a food processor or stick blender. Mix the crumbs with melted butter until fully combined. Press the mixture evenly into the bottoms of your silicone molds or lined cupcake trays to form a sturdy base. Refrigerate.
2. Dissolve the Gelatine:
Mix the gelatine with boiling water, stirring until completely dissolved. Place the mixture over a hot water bath to keep it warm and prevent it from setting prematurely.
3. Make the Cheesecake Filling:
Beat the cream cheese and powdered sugar together until smooth and lump-free. Add vanilla and Biscoff spread, and mix again until fully combined. Add the heavy cream and while mixing, add the warm gelatine mixture and beat until the filling thickens.
4. Assemble the Cheesecakes:
Pipe or spoon half the cheesecake filling into the molds, filling them halfway. Smear a small amount of Biscoff spread inside each mold.. Add the remaining cheesecake filling, leveling the tops with a spatula. Freeze the molds overnight.
5. Unmold the Cheesecakes:
Once frozen, gently push the cheesecakes out of the silicone molds. If using lined cupcake trays, peel away the liners carefully. Place the cheesecakes on a serving platter and refrigerate while preparing the topping.
6. Prepare the Whipped Topping:
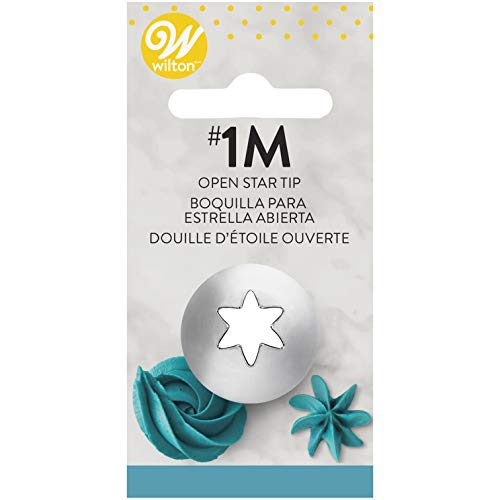
Whip the heavy cream with powdered sugar and vanilla until stiff peaks form. Transfer the whipped cream to a piping bag fitted with a 1M piping tip. Pipe a swirl of whipped cream onto each cheesecake.
7. Add Garnishes:
Decorate each cheesecake with a Biscoff cookie pressed into the whipped cream. Sprinkle with reserved cookie crumbs and drizzle melted Biscoff spread over the top for a finishing touch.
8. Thaw and Store:
Refrigerate your Mini Biscoff Cheesecakes for 2 hours to thaw before serving chilled.
Fay's Top Tip
Freeze the cheesecakes overnight before removing them from the molds. This ensures they set completely and release cleanly from the molds without damage, giving you perfectly shaped desserts every time.
Serving Suggestions for Mini Biscoff Cheesecakes
Drizzle with Sauce: Serve with an extra drizzle of caramel sauce for added sweetness and visual appeal.
Add Fresh Fruit: Pair the cheesecakes with fresh berries like raspberries, strawberries, or sliced bananas to balance the rich flavors.
Sprinkle Toppings: Top with crushed nuts, like pecans or almonds, for a crunchy contrast.
Add Ice Cream: Serve with a small scoop of vanilla ice cream or caramel ice cream for an extra indulgent treat. My Biscoff Ice Cream Cups are a quick no-churn option with a strong cookie flavor.
Mini Dessert Platter: Include these Mini Biscoff Cheesecakes as part of a dessert platter with macarons, chocolate truffles, or mini tarts for variety.
More Cheesecake Recipes
Frequently Asked Questions
Yes, you can substitute Biscoff cookies with graham crackers, digestive biscuits, or any spiced cookie for a similar texture and flavor.
You can use a regular cupcake tray lined with sturdy baking cups. Just freeze the cheesecakes thoroughly for easy removal.
Absolutely! These Mini Biscoff Cheesecakes can be made and stored in the freezer undecorated for up to a month in an airtight container.
You can use another cookie butter or even Nutella, though it will change the flavor profile.
Mini Biscoff Cheesecakes
INGREDIENTS
Crumb Base:
- 200 g (8.8 oz) Biscoff cookies
- 80 g (2.8 oz) butter unsalted and melted or softened
Cheesecake Filling
- 2 teaspoon (2 teaspoon) gelatine powder
- 2 tablespoon (2 tablespoon) water hot
- 500 g (1.1 lb) cream cheese
- 120 g (¾ cup) powdered sugar
- 2 teaspoon (2 teaspoon) vanilla
- ½ cup (½ cup) Biscoff spread or cookie butter
- 400 ml (13.5 floz) heavy cream
- ¼ cup (¼ cup) Biscoff spread extra for smearing on side of moulds
Topping
- 250 ml (8.5 floz) heavy cream
- 1 teaspoon (1 teaspoon) vanilla
- 1 tablespoon (1 tablespoon) powdered sugar
Garnish
- 1 tablespoon (1 tablespoon) Biscoff cookie crumbs previously reserved
- 16 (16) Biscoff cookies
- ⅓ cup (⅓ cup) Biscoff spread warmed in microwave for 20 seconds


INSTRUCTIONS
Crumb Base
- Blend Biscoff cookies into a fine crumb using a food processor or stick blender.
- Mix crumbs with melted butter. Reserve 1 tablespoon for garnish.
- Divide the crumb mixture evenly between 16 molds or lined cupcake trays. Press firmly. Refrigerate.
Cheesecake Filling
- Dissolve gelatine in boiling water and stir until smooth. Keep warm over a hot water bath.
- Beat cream cheese and powdered sugar until smooth.
- Add vanilla and Biscoff spread. Mix for 1 minute, scraping the bowl as needed.
- Add heavy cream and while mixing, incorporate the warm gelatine. Mix until thickened.
- Pipe or spoon cheesecake filling halfway into molds.
- Smear a small amount of Biscoff spread inside each mold cavity.
- Fill molds to the top with remaining cheesecake filling and level with a spatula.
- Freeze overnight.
Topping and Garnish
- Whip heavy cream, powdered sugar, and vanilla until stiff peaks form.
- Add whipped cream topping to a piping bag fitted with a 1M piping tip.
- Pipe a swirl on each cheesecake.
- Press a Biscoff cookie into the cream, sprinkle with reserved crumbs, and drizzle with melted Biscoff spread. (Spread can be warmed in the microwave for 20 seconds).
- Refrigerate cheesecakes for 2 hours before serving to defrost.
NOTES
- Use silicone cupcake molds for easy removal of frozen cheesecakes.
- For a smooth filling, scrape down the bowl during mixing.
- Keep gelatine warm to prevent premature setting.
- Store cheesecakes in an airtight container in the freezer for up to a month before decorating.
- Allow cheesecakes to thaw in the refrigerator for 2 hours before serving for the best texture.


Susan says
These were to die for! Made exactly as the recipe. I wouldn’t change a thing! They looked so professional, too! My friends thought I’d purchased them!
Fay says
How fabulous Susan! I’m so glad you and your friends enjoyed them. Would love it if you would consider a star rating as well. Thanks for posting!
ilona Melham says
made these and everyone loved them
Jeff says
I have a question about the final cheesecakes in the video, they seem to have large unincorporated globs of Biscoff but in the video when making them you show all the ingredients getting mixed together completely. What's the story there? Do lightly mix in Biscoff at the end ?
Fay says
If you go to 5:03 in the video, you will see me adding extra spoonfuls of the cookie butter between the layers. These show up on the sides.