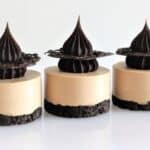
Mini Mars Bar Cheesecakes
Mini Mars Bar Cheesecakes. This recipe is a delicious take on a no-bake cheesecake that combines the richness of Mars bars with the smooth silkiness of a cheesecake.
Servings 16 Mini Cheesecakes
Calories 1325kcal
EQUIPMENT
- Mini Round Silicone Moulds
- Stick Blender
- 18 Inch Piping Bags
INGREDIENTS
Base
- 265g (112 ⅙ oz) chocolate cookies plain or cream filled
- 100 g (3 ½ oz) butter unsalted, melted
Mars Bar Filling
- 2 teaspoon (2 teaspoon) gelatine
- 2 tablespoon (2 tablespoon) water hot from the kettle
- 3 (3) milky way or 8 minis - mars bars
- 2 tablespoon (2 tablespoon) heavy cream
- 375 g (1 ⅔ cups) cream cheese
- ¾ cup (¾ cup) powdered sugar
- 1 teaspoon (1 teaspoon) vanilla
- 400 ml (1 ⅔ cups) heavy cream
Chocolate Decorations
- ½ cup (½ cup) dark chocolate or compound chocolate
Truffle Ganache Kisses
- 300 g (1 5/7 cups) dark chocolate
- 150 g (⅝ cups) heavy cream
INSTRUCTIONS
Base
- Crush the Oreos or biscuits into fine crumbs using a stick blender or wooden rolling pin.
- Mix with melted butter until well combined.
- Press the mixture into the base of a cupcake tray lined with baking cups or 8 Cavity Silicone Moulds. This ensures easy removal of cheesecakes after freezing.
- Chill in the fridge to set while you prepare the filling.
Mars Bar Filling
- In a small bowl, dissolve the gelatine in boiling water and stir well with a mini whisk. Set aside.
- Chop the Mars Bars into small pieces.
- In a saucepan, combine Mars Bar pieces and 2 tablespoons of cream. Melt over medium heat, stirring occasionally. Remove from heat once melted and smooth.
- In a mixing bowl, beat together the cream cheese and powdered sugar until smooth.
- Add the melted Mars Bar mixture to the cream cheese and mix well.
- Add the vanilla and heavy cream and begin to mix.
- Gradually add the gelatine mixture. Mix until everything is well combined and smooth.
- Pour or spoon the Mars Bar filling over the biscuit base in each cup.
- Smooth the tops with an angled spatula or the back of a spoon.
- Chill in the freezer until set, usually about 6 hours or overnight depending on your freezer.
Chocolate Decorations
- Melt the chocolate in a heatproof bowl over a pot of simmering water or in short bursts in the microwave, stirring until smooth.
- Transfer the melted chocolate to a 14 inch piping bag. If you don't have a piping bag, you can use a small ziplock bag and snip off a tiny corner.
- Pipe the melted chocolate onto the parchment paper to form small circles, each about the size of a coin. While piping the circles, add a little squiggle pattern to each for a decorative touch. This can be seen in the video.
- Let these chocolate decorations set in the fridge until firm. This should take about 10-15 minutes.
Truffle Ganache Kisses
- Pour the hot cream over the chopped chocolate. Let it sit for a minute to gently melt the chocolate.
- Stir the mixture until the chocolate is completely melted and the mixture is smooth.
- Allow the ganache to cool to room temperature. Once cooled, refrigerate it.
- Stir the ganache every 10 minutes while it's in the refrigerator. This helps to prevent it from setting too hard and maintains a smooth texture.
- Once the ganache is thick enough to pipe but still soft, transfer it to a piping bag fitted with a large French star tip.
- Pipe a ganache kiss directly onto each cupcake, Place a chocolate circle decoration on top of the ganache kiss pressing gently.
- Finish off by piping another ganache kiss on top of the chocolate decoration. This can be seen in the video.
Thaw
- Place decorated cheesecakes on a platter uncovered in the refrigerator for a couple of hours to thaw before serving.
NUTRITION
Calories: 1325kcal | Carbohydrates: 171g | Protein: 18g | Fat: 66g | Saturated Fat: 32g | Polyunsaturated Fat: 10g | Monounsaturated Fat: 20g | Trans Fat: 0.2g | Cholesterol: 84mg | Sodium: 1299mg | Potassium: 670mg | Fiber: 9g | Sugar: 93g | Vitamin A: 1050IU | Vitamin C: 0.3mg | Calcium: 139mg | Iron: 11mg
