
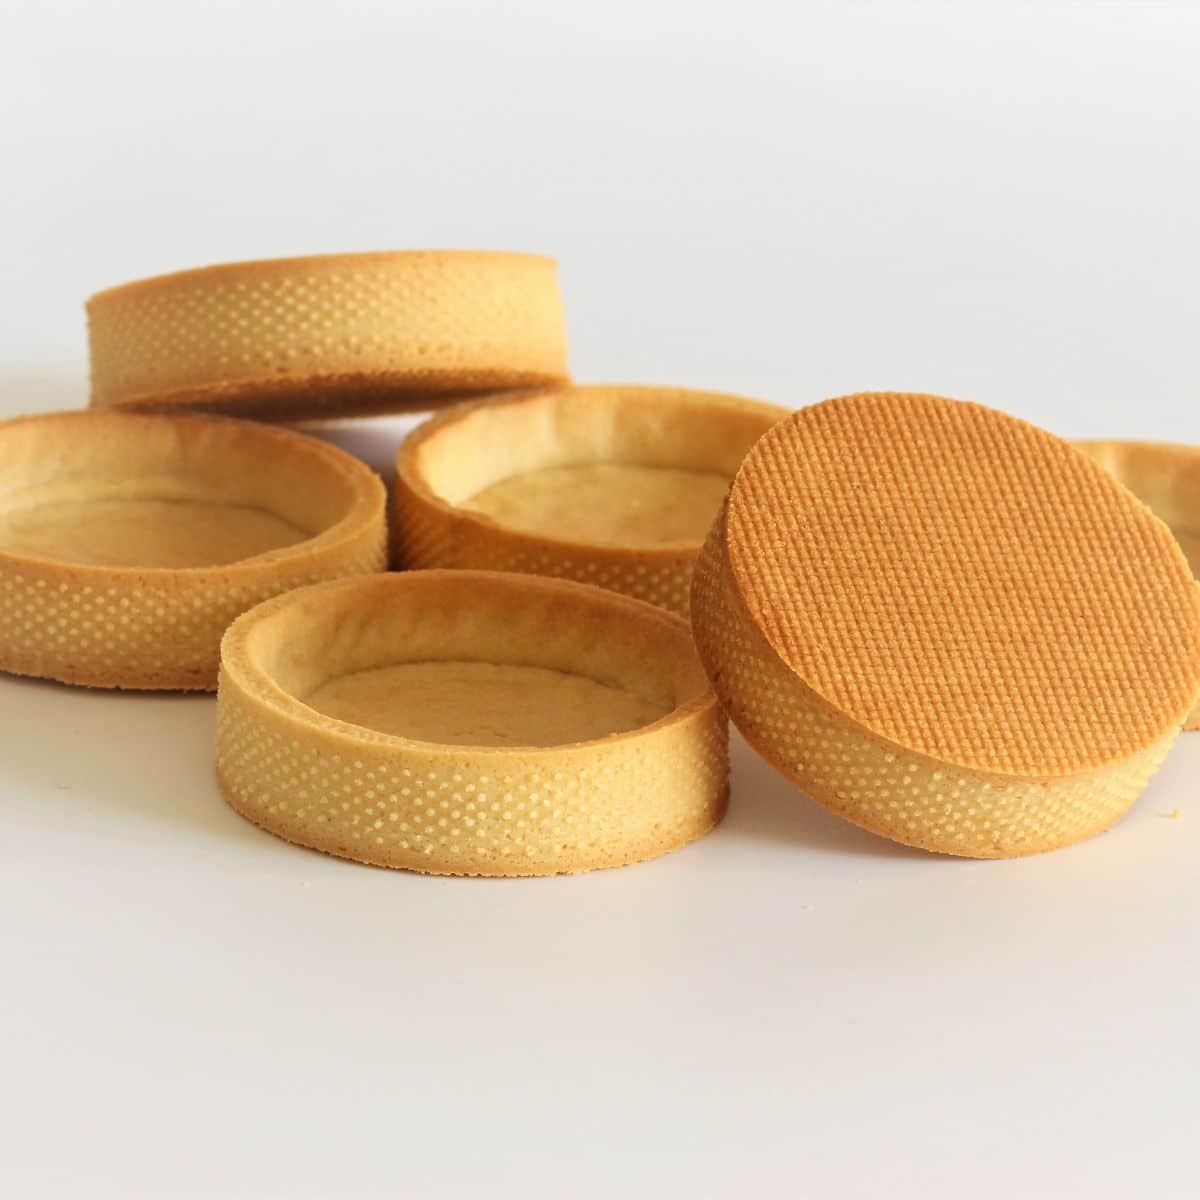
This sweet shortcrust pastry (pâte sablée) recipe makes beautifully crisp and buttery tart shells every single time. You don't need to blind bake, and they hold their shape perfectly while baking. These sweet shortcrust pastry cases are simple to make, taste incredible, and are perfect for filling with ganache, custard, curd, or anything you love.
SUMMARISE AND SAVE THIS RECIPE
Why You’ll Love This Sweet Shortcrust Pastry (Pâte Sablée)
You'll love this sweet shortcrust pastry (pâte sablée) because it's quick, simple, and foolproof. The butter, flour, and almond meal come together fast in the food processor. The dough rolls easily, holds its shape, and bakes into crisp pastry cases every time.
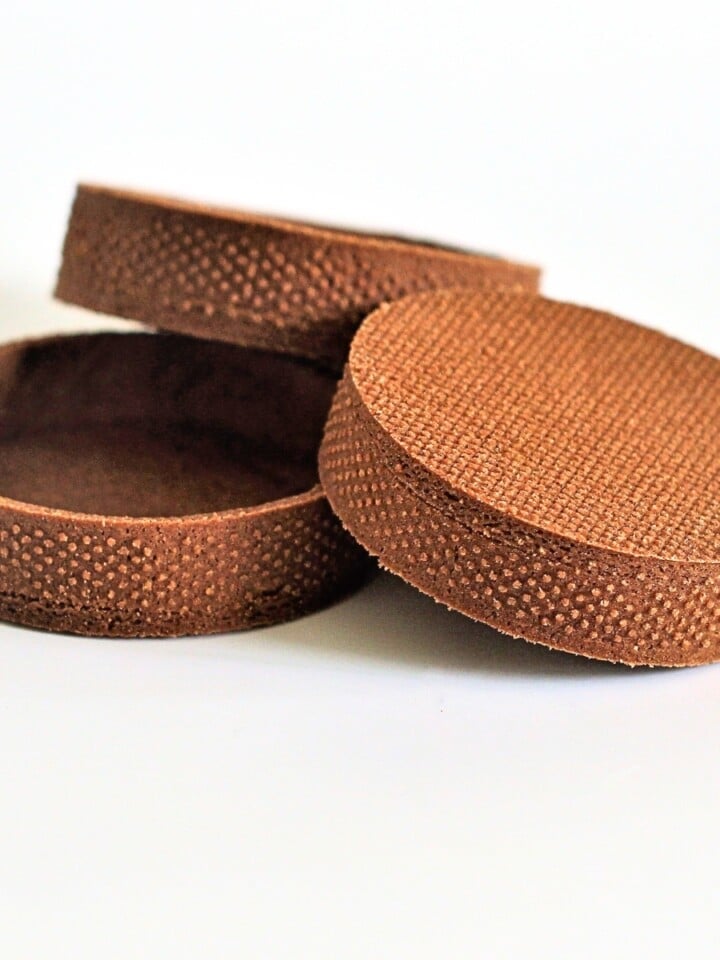
You can also try my Chocolate Tart Shells if you want a rich cocoa base for your desserts. Both versions are perfect for Lemon Meringue Tarts or filled with chocolate truffle ganache like in my Ganache Tart with Mixed Berry Whipped Cream.
Ingredients for Almond Sweet Shortcrust Pastry Cases
All-Purpose Flour: Also called plain flour. It forms the structure of your sweet shortcrust pastry and gives it a tender crumb.
Icing Sugar: Adds sweetness and helps create that delicate, melt-in-your-mouth texture.
Almond Meal: Brings a light nutty flavor and makes the pastry slightly denser, which helps it hold shape and adds a buttery taste.
Salt: Balances the sweetness and gives the pastry more depth.
Cold Unsalted Butter: Cold butter adds richness and creates a flaky, crisp texture. It's key to a tender pâte sablée base.
Egg: Works as a binder, helping the dough hold together while adding moisture and structure.
Vanilla Extract: Adds a hint of flavor that rounds out the sweetness.
💡 Variation Tip
If you'd like a chocolate version, try my Chocolate Tart Shells recipe. It follows the same easy method with a little cocoa powder for a rich, chocolatey finish.

How to Make Pâte Sablée Tart Shells
Combine Dry Ingredients: Add the all-purpose flour, icing sugar, almond meal, salt, and cold butter to a food processor. Pulse until the mixture looks like coarse crumbs. This step builds the base of your sweet shortcrust pastry.
Add Egg and Vanilla: Crack in the egg and pour in the vanilla extract. Pulse again until the dough just starts to come together and form a soft ball.

Roll Out the Dough: Roll the sweet shortcrust pastry between two sheets of parchment paper to about 3 mm thick. Use a rolling pin with spacer guides for an even finish.
Chill the Dough: Place the rolled pastry in the fridge for 20 minutes so it firms up and is easier to work with.
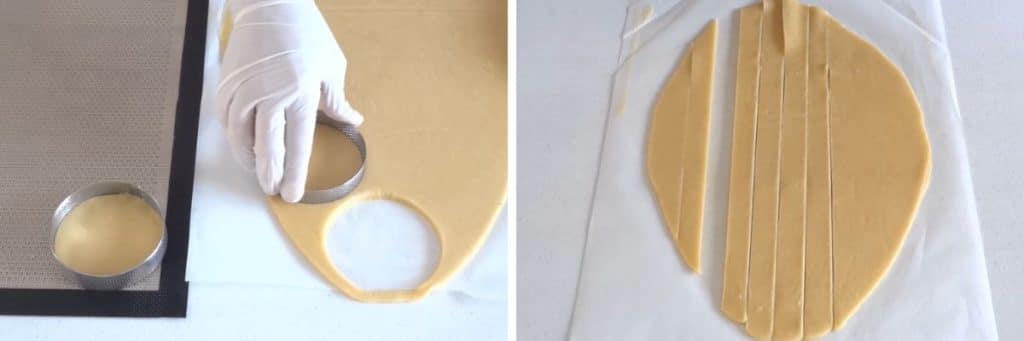
Cut Tart Bases: Use pastry rings to cut out the tart bases. Lay them on a baking tray lined with parchment paper or a perforated silicone mat.
Cut Tart Sides: Slice long strips from the chilled dough to form the tart sides. A ruler helps keep the edges straight for a neat finish.
Shape and Trim: Line the tart rings with the pastry strips and gently press them into place. Trim any extra pastry from the top for a smooth edge.
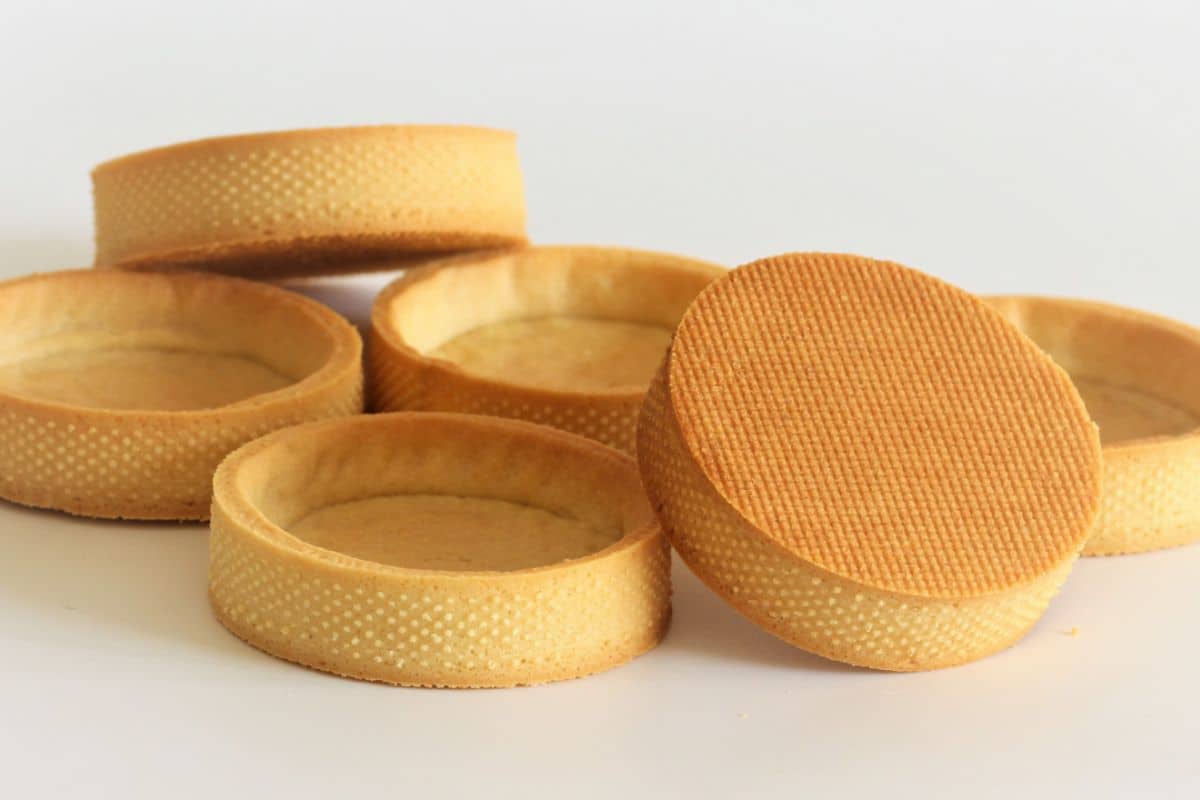
Bake: Place the tray in a preheated oven at 355°F (180°C) and bake for 15 minutes or until the sweet shortcrust pastry cases turn golden.
Cool: Let the pastry cases cool completely on the tray before lifting them out of the tart rings. This helps them stay crisp and hold their shape.

Pro Tips for Perfect Sweet Shortcrust Pastry Cases
- Keep the butter cold.Cold butter is key for flaky, crisp pastry shells. It helps create a tender crumb and prevents the dough from becoming greasy.
- Don't overmix the dough.Pulse or mix only until it comes together. Overmixing can make your pâte sablée tough instead of delicate.
- Chill before baking.Let the shaped pastry cases chill in the fridge before baking. This helps them hold their shape and keeps the edges clean.
- Use perforated tart rings and trays.Perforated tart rings, a baking tray, and a silicone mat allow air to circulate evenly, giving you evenly baked, golden sweet shortcrust pastry cases.
- Skip the blind baking.This method bakes the pastry cases completely without weights or beans, saving you time while still giving a crisp, golden finish.
The Secret to Perfect Shortcrust Pastry Cases
The best thing about these sweet shortcrust pastry cases is that you don't need to blind bake them. With a few simple tricks and the right tools, you'll get crisp, golden tart shells that look and taste amazing.
The secret is using perforated tart rings, a baking tray, and a silicone mat. They let the heat and air move evenly, so your sweet shortcrust pastry bakes beautifully in just 15 minutes. It's all about keeping things simple while still getting bakery-quality results.
Storing Sweet Shortcrust Pastry Cases
Keeping your sweet shortcrust pastry cases fresh and crisp is easy with the right storage method. Follow these simple tips to maintain their perfect texture and flavor.
Room Temperature (Short Term):
Let your pastry cases cool completely, then store them in an airtight container at room temperature. They'll stay fresh for up to 2 days without losing their crispness. Always keep the container tightly sealed to stop them from going stale.
Refrigeration (Up to 4 Days):
If you want to store them a little longer, pop them in the fridge. Use an airtight container to prevent them from picking up any fridge odors. They'll stay fresh for another day or two beyond room temperature storage.
Freezing (Up to 2 Months):
For longer storage, freeze the sweet shortcrust pastry cases in a single layer inside a freezer-safe container. Place parchment paper between layers so they don't stick. Label the container with the date so you can easily keep track.
Thawing and Reheating:
When you're ready to use them, move the frozen pastry cases to the fridge and let them thaw slowly. Once thawed, pop them into a preheated oven for a few minutes to bring back their crisp texture.
Tip:
Always let your pastry cases cool completely before storing. If you're stacking them, add a sheet of parchment paper between each layer to protect their shape.
Make It ✨ Snap It 📸 Share It! 🍨
If you whip up one of my desserts, I'd love to see it! 😍 Tag me on Instagram or Facebook so I can check out your creation. I'll be reposting my favorites and giving shout-outs in my stories! 🎉 It's always fun to see your unique twists on my recipes, so don't be shy, snap a pic and share it! 📢🍰 #CupcakeSavvysKitchen
Common Questions About Pâte Sablée and Pastry Cases
If you don't have almond meal, you can skip it or swap it for the same amount of all-purpose flour. The flavor will be slightly different, but your sweet shortcrust pastry will still taste amazing.
Yes, you can use salted butter if that's what you have. Just leave out any extra salt in the recipe so the pastry doesn't become too salty.
If your pastry cases aren't as crisp, they may have a bit too much moisture. Next time, bake them a little longer at a slightly lower temperature. If they're already baked, you can reheat them in the oven for a few minutes to crisp them back up.
Absolutely. You can make the sweet shortcrust pastry dough up to 2 days in advance. Wrap it well and keep it in the fridge. When you're ready to use it, let it sit at room temperature for a few minutes so it's easier to roll out.
Yes. You can use your fingertips or a pastry blender to rub the butter into the dry ingredients until it looks like breadcrumbs. Then mix in the wet ingredients until a dough forms. It takes a bit longer, but it works just as well.
Sweet Shortcrust Pastry (Pâte Sablée)
INGREDIENTS
- 235 g (8⅓ oz) all-purpose flour
- 95 g (3½ oz) powdered sugar
- 40 g (1½ oz) almond flour
- 1 pinch salt
- 120 g (½ cups) butter cold and cubed
- 1 egg large
- 2 teaspoon vanilla extract


INSTRUCTIONS
- Preheat the oven to 355℉/180℃
- In a food processor, combine all-purpose flour, icing sugar, almond flour, salt, and cold cubed unsalted butter. Mix briefly until the mixture resembles fine crumbs.
- Add the egg and vanilla extract. Mix again until a ball of dough starts to form.
- Place the dough between two sheets of parchment paper and roll it out to a thickness of 3mm using a rolling pin with spacer guides.
- Refrigerate the rolled-out dough for 20 minutes or until firm.
- Use the perforated tart rings to cut out bases for the tarts and place them on a perforated baking tray lined with a perforated silicone mat.
- Using a ruler as a guide, cut strips from the rolled-out dough for the sides of the tart rings. Place the strips in the tart rings and trim the excess pastry from the tops of the rings.
- Bake the pastry cases in the preheated oven for 15 minutes or until they turn golden.
- Allow the pastry cases to cool completely on the tray before removing them from the tart rings.
- Once cooled, store the pastry cases in an airtight container at room temperature for up to 2 days.
NOTES
💡 Pro Tips
- Keep the butter cold for flaky, crisp pastry shells.
- Don't overmix - mix just until combined for a tender pâte sablée.
- Chill before baking to help the pastry cases keep their shape.
- Use perforated rings, tray, and mat for even baking.
- Skip blind baking - this method bakes the pastry cases fully in one go.
❄️ Storage Tips
- Room temperature: Store cooled pastry cases in an airtight container for 2 days.
- Fridge: Store up to 4 days total in an airtight container.
- Freezer: Freeze in a single layer with parchment between layers for up to 2 months.
- Reheat: Thaw in the fridge and warm briefly in a preheated oven to refresh crispness.


Michael Montgomery says
Does the dough need to be pricked with a fork prior to baking?
Fay says
Hi Michael, if using the perforated baking sheets and rings the dough doesn't need to be pricked with a fork before baking.
Fay says
How fabulous! I'm so thrilled Michael. The initial investment can be a bit expensive but in the long run, it is SO worth it! I make large batches and freeze them as well. SO handy to have for a last-minute dessert! Thanks so much for the feedback!
Michael Montgomery says
Not only are these delicious, but incredibly easy to make. I did invest in all of the perforated tools mentioned in the recipe but I will use them for other things as well. I made them yesterday, but only a single recipe because I wasn’t sure how they would turn out. Today I’m going to make more. I’m freezing them for Easter. I put them in the freezer until they were hard and then I vacuum sealed them. I was afraid they might break but they didn’t. These would be great for a make ahead dessert. Just saw them and filled them with something.
Fay says
How fabulous!
Selly says
Question: does the perforated ring need to be greease with butter or something so the dough will not stick? I try to made it but the pastry cases cannot be easily removed from the ring.Also the pastry expand a bit, so the surface not flat (I use the perforated baking mat as well, and the left over dough without the ring is stay flat.
Fay says
You can grease it if you like but there is no need as the pastry will shrink slightly around the edges. You can use a fork to prick holes in the base before baking if you like. I don't mind if it puffs a tiny bit because it will be filled.
Liz says
What size are the perforated rings?
Fay says
Hi Liz! I have linked the tart rings in the recipe card for you.
Beth says
Hello. Can I use a cooling rack instead of the perforated pan? I do have the perforated rings and a perforated mat, but not the perforated pan. So I would use the mat with the wire rack on a cookie sheet if that would work.
Fay says
Hi Beth, I haven't tried it myself but it's worth a shot! It will enable the air to circulate. It may be a good idea to prick the pastry base with a fork as well.
Glenda Horstman says
Hi, what chocolate seal do you use, please. Would love a demo on how to use this and achieve perfect result. Thank you.
Fay says
Hi Glenda! I have a full blog post on the chocolate seals which you can find at this link https://cupcakesavvyskitchen.com/stamped-chocolate-dessert-toppers/
Fay says
Lovely golden color. Nice and crisp! Beautiful!